|
| Wednesday, May 27, 2009 |
| Migrating Oracle10g DB to ASM |
Step By Step Instructions on Migrating Oracle10g Database to Automatic Storage management (ASM)
Disable Block change tracking:
SQL> select * from v$block_change_tracking;
STATUS
----------
FILENAME
--------------------------------------------------------------------------------
BYTES
----------
DISABLED
If not disabled then, disble using this command.
SQL> ALTER DATABASE DISABLE BLOCK CHANGE TRACKING;
Database altered.
SQL>
Shutdown Database Cleanly:
SQL> shutdown immediate
Database closed.
Database dismounted.
ORACLE instance shut down.
SQL> exit
Disconnected from Oracle Database 10g Enterprise Edition Release 10.2.0.1.0 - Production
With the Partitioning, OLAP and Data Mining options
Create pfile and add/modify the below parameters:
[oracle@node1-pub oracle]$ sqlplus "/ as sysdba"
SQL*Plus: Release 10.2.0.1.0 - Production on Fri Jul 21 12:17:50 2006
Copyright (c) 1982, 2005, Oracle. All rights reserved.
Connected to an idle instance.
SQL> create pfile from spfile;
File created.
Modify pfile with these parameters:
I have already created 2 ASM diskgroups DATA and FLASH.
*.control_files=(+DATA, +FLASH)
*.db_recovery_file_dest=+FLASH
*.db_recovery_file_dest_size=2147483648
*.db_create_file_dest=+DATA
*.db_create_online_log_dest_1=+FLASH
*.db_create_online_log_dest_2=+DATA -- optional if you want another online redo logs dest.
Create spfile back from modified pfile:
PS: take a copy of original spfile before you overwrite spfile using below command.
SQL> create spfile from pfile;
File created.
SQL> exit
Disconnected
Copy Database to ASM diskgroups using rman:
(1) start the instance on NOMOUNT state
(2) copy the controlfile from old location to ASM usin "resrore" rman command
(3) mount the database
(4) copy the datafiles to ASM disk group using rman "BACKUP AS COPY DATABASE" command
(5) Switch database to COPY and open the database.
[oracle@node1-pub oracle]$ $ORACLE_HOME/bin/rman
Recovery Manager: Release 10.2.0.1.0 - Production on Fri Jul 21 10:03:10 2006
Copyright (c) 1982, 2005, Oracle. All rights reserved.
RMAN> connect target
connected to target database (not started)
RMAN> startup nomount
Oracle instance started
Total System Global Area 167772160 bytes
Fixed Size 1218316 bytes
Variable Size 83888372 bytes
Database Buffers 79691776 bytes
Redo Buffers 2973696 bytes
RMAN> restore controlfile from '/home/oracle/oradata/db10g/control01.ctl';
Starting restore at 21-JUL-06
using target database control file instead of recovery catalog
allocated channel: ORA_DISK_1
channel ORA_DISK_1: sid=157 devtype=DISK
channel ORA_DISK_1: copied control file copy
output filename=+DATA/db10g/controlfile/backup.256.596369129
output filename=+FLASH/db10g/controlfile/backup.256.596369131
Finished restore at 21-JUL-06
RMAN> startup mount
database is already started
database mounted
released channel: ORA_DISK_1
RMAN> configure device type disk parallelism 4;
new RMAN configuration parameters:
CONFIGURE DEVICE TYPE DISK PARALLELISM 4 BACKUP TYPE TO BACKUPSET;
new RMAN configuration parameters are successfully stored
RMAN> BACKUP AS COPY DATABASE FORMAT '+DATA';
Starting backup at 21-JUL-06
allocated channel: ORA_DISK_1
channel ORA_DISK_1: sid=152 devtype=DISK
allocated channel: ORA_DISK_2
channel ORA_DISK_2: sid=151 devtype=DISK
allocated channel: ORA_DISK_3
channel ORA_DISK_3: sid=150 devtype=DISK
allocated channel: ORA_DISK_4
channel ORA_DISK_4: sid=149 devtype=DISK
channel ORA_DISK_1: starting datafile copy
input datafile fno=00001 name=/home/oracle/oradata/db10g/system01.dbf
channel ORA_DISK_2: starting datafile copy
input datafile fno=00003 name=/home/oracle/oradata/db10g/sysaux01.dbf
channel ORA_DISK_3: starting datafile copy
input datafile fno=00002 name=/home/oracle/oradata/db10g/undotbs01.dbf
channel ORA_DISK_4: starting datafile copy
input datafile fno=00004 name=/home/oracle/oradata/db10g/users01.dbf
output filename=+DATA/db10g/datafile/undotbs1.259.596369341 tag=TAG20060721T100858 recid=2 stamp=596369352
channel ORA_DISK_3: datafile copy complete, elapsed time: 00:00:16
channel ORA_DISK_3: starting datafile copy
copying current control file
output filename=+DATA/db10g/datafile/users.260.596369341 tag=TAG20060721T100858 recid=1 stamp=596369350
channel ORA_DISK_4: datafile copy complete, elapsed time: 00:00:20
channel ORA_DISK_4: starting full datafile backupset
channel ORA_DISK_4: specifying datafile(s) in backupset
output filename=+DATA/db10g/controlfile/backup.261.596369361 tag=TAG20060721T100858 recid=3 stamp=596369364
channel ORA_DISK_3: datafile copy complete, elapsed time: 00:00:06
including current SPFILE in backupset
channel ORA_DISK_4: starting piece 1 at 21-JUL-06
channel ORA_DISK_4: finished piece 1 at 21-JUL-06
piece handle=+DATA/db10g/backupset/2006_07_21/nnsnf0_tag20060721t100858_0.262.596369369 tag=TAG20060721T100858 comment=NONE
channel ORA_DISK_4: backup set complete, elapsed time: 00:00:10
output filename=+DATA/db10g/datafile/sysaux.258.596369341 tag=TAG20060721T100858 recid=4 stamp=596369390
channel ORA_DISK_2: datafile copy complete, elapsed time: 00:01:05
output filename=+DATA/db10g/datafile/system.257.596369339 tag=TAG20060721T100858 recid=5 stamp=596369414
channel ORA_DISK_1: datafile copy complete, elapsed time: 00:01:21
Finished backup at 21-JUL-06
RMAN> SWITCH DATABASE TO COPY;
datafile 1 switched to datafile copy "+DATA/db10g/datafile/system.257.596369339"
datafile 2 switched to datafile copy "+DATA/db10g/datafile/undotbs1.259.596369341"
datafile 3 switched to datafile copy "+DATA/db10g/datafile/sysaux.258.596369341"
datafile 4 switched to datafile copy "+DATA/db10g/datafile/users.260.596369341"
RMAN> alter database open;
database opened
RMAN> exit
Recovery Manager complete.
Migrate tempfile to ASM:
RMAN does not migrate the tempfile as part of the BACKUP AS COPY and SWITCH command becuase the tempfile is not listed in controlfile.
The tempfile has to be manually migrated to ASM.
[oracle@node1-pub oracle]$ sqlplus "/ as sysdba"
SQL*Plus: Release 10.2.0.1.0 - Production on Fri Jul 21 10:12:42 2006
Copyright (c) 1982, 2005, Oracle. All rights reserved.
Connected to:
Oracle Database 10g Enterprise Edition Release 10.2.0.1.0 - Production
With the Partitioning, OLAP and Data Mining options
SQL> select name, bytes from v$tempfile;
NAME
--------------------------------------------------------------------------------
BYTES
----------
/home/oracle/oradata/db10g/temp01.dbf
20971520
SQL> create temporary tablespace temp1 tempfile SIZE 100M extent management local uniform size 1M;
Tablespace created.
SQL> alter database default temporary tablespace temp1;
Database altered.
SQL> drop tablespace temp including contents;
Tablespace dropped.
SQL> create temporary tablespace temp tempfile SIZE 100M extent management local uniform size 1M;
Tablespace created.
SQL> alter database default temporary tablespace temp;
Database altered.
SQL> drop tablespace temp1 including contents;
Tablespace dropped.
SQL> select name from v$tempfile;
NAME
--------------------------------------------------------------------------------
+DATA/db10g/tempfile/temp.264.596370217
Migrate and drop the old Online Redo Logs to ASM:
Run the below procedure to migrate the redo logs to ASM. This program is taken from OTN/metalink.
SQL> declare
cursor orlc is
select lf.member, l.bytes
from v$log l, v$logfile lf
where l.group# = lf.group# and
lf.type = 'ONLINE'
order by l.thread#, l.sequence#;
type numTab_t is table of number index by binary_integer;
type charTab_t is table of varchar2(1024) index by binary_integer;
byteslist numTab_t; namelist charTab_t;
procedure migrateorlfile(name IN varchar2, bytes IN number) is
retry number;
stmt varchar2(1024);
als varchar2(1024) := 'alter system switch logfile';
begin
select count(*) into retry from v$logfile;
stmt := 'alter database add logfile size ' || bytes;
execute immediate stmt;
stmt := 'alter database drop logfile ''' || name || '''';
for i in 1..retry loop
begin execute immediate stmt;
exit;
exception
when others then
if i > retry then raise;
end if;
execute immediate als;
end;
end loop;
end;
begin
open orlc;
fetch orlc bulk collect into namelist, byteslist;
close orlc;
for i in 1..namelist.count loop migrateorlfile(namelist(i), byteslist(i));
end loop;
end;
/
2 3 4 5 6 7 8 9 10 11 12 13 14 15 16 17 18 19 20 21 22 23 24 25 26 27 28 29 30 31 32 33 34 35 36 37 38 39 40
PL/SQL procedure successfully completed.
SQL> SQL>
SQL>
SQL> select member from v$logfile;
MEMBER
--------------------------------------------------------------------------------
+FLASH/db10g/onlinelog/group_3.259.596373299
+FLASH/db10g/onlinelog/group_2.258.596373295
/home/oracle/oradata/db10g/redo01.log
+FLASH/db10g/onlinelog/group_4.257.596373293
SQL> alter system switch logfile;
System altered.
SQL> /
System altered.
SQL> /
System altered.
SQL> /
System altered.
Re-Execute the same script again in order to migrate the remaining ones.
SQL> declare
cursor orlc is
select lf.member, l.bytes
from v$log l, v$logfile lf
where l.group# = lf.group# and
lf.type = 'ONLINE'
order by l.thread#, l.sequence#;
type numTab_t is table of number index by binary_integer;
type charTab_t is table of varchar2(1024) index by binary_integer;
byteslist numTab_t; namelist charTab_t;
procedure migrateorlfile(name IN varchar2, bytes IN number) is
retry number;
stmt varchar2(1024);
als varchar2(1024) := 'alter system switch logfile';
begin
select count(*) into retry from v$logfile;
stmt := 'alter database add logfile size ' || bytes;
execute immediate stmt;
stmt := 'alter database drop logfile ''' || name || '''';
for i in 1..retry loop
begin execute immediate stmt;
exit;
exception
when others then
if i > retry then raise;
end if;
execute immediate als;
end;
end loop;
end;
begin
open orlc;
fetch orlc bulk collect into namelist, byteslist;
close orlc;
for i in 1..namelist.count loop migrateorlfile(namelist(i), byteslist(i));
end loop;
end;
/ 2 3 4 5 6 7 8 9 10 11 12 13 14 15 16 17 18 19 20 21 22 23 24 25 26 27 28 29 30 31 32 33 34 35 36 37 38 39 40
PL/SQL procedure successfully completed.
SQL> select member from v$logfile;
MEMBER
--------------------------------------------------------------------------------
+FLASH/db10g/onlinelog/group_3.259.596373619
+FLASH/db10g/onlinelog/group_2.258.596373615
+FLASH/db10g/onlinelog/group_1.261.596373613
+FLASH/db10g/onlinelog/group_4.257.596373293
+FLASH/db10g/onlinelog/group_5.260.596373609
SQL> exit
Disconnected from Oracle Database 10g Enterprise Edition Release 10.2.0.1.0 - Production
With the Partitioning, OLAP and Data Mining options
DELETE THE OLD DATAFILES USING RMAN.
This way, it will also clear out the datafiles entry from controlfile.
[oracle@node1-pub oracle]$ $ORACLE_HOME/bin/rman
Recovery Manager: Release 10.2.0.1.0 - Production on Fri Jul 21 11:22:33 2006
Copyright (c) 1982, 2005, Oracle. All rights reserved.
RMAN> connect target
connected to target database: DB10G (DBID=4283639931)
RMAN> run {
2> DELETE COPY OF DATABASE;
3> }
using target database control file instead of recovery catalog
allocated channel: ORA_DISK_1
channel ORA_DISK_1: sid=134 devtype=DISK
allocated channel: ORA_DISK_2
channel ORA_DISK_2: sid=151 devtype=DISK
allocated channel: ORA_DISK_3
channel ORA_DISK_3: sid=153 devtype=DISK
allocated channel: ORA_DISK_4
channel ORA_DISK_4: sid=138 devtype=DISK
List of Datafile Copies
Key File S Completion Time Ckp SCN Ckp Time Name
------- ---- - --------------- ---------- --------------- ----
6 1 A 21-JUL-06 461254 21-JUL-06 /home/oracle/oradata/db10g/system01.dbf
7 2 A 21-JUL-06 461254 21-JUL-06 /home/oracle/oradata/db10g/undotbs01.dbf
8 3 A 21-JUL-06 461254 21-JUL-06 /home/oracle/oradata/db10g/sysaux01.dbf
9 4 A 21-JUL-06 461254 21-JUL-06 /home/oracle/oradata/db10g/users01.dbf
Do you really want to delete the above objects (enter YES or NO)? YES
deleted datafile copy
datafile copy filename=/home/oracle/oradata/db10g/system01.dbf recid=6 stamp=596369439
deleted datafile copy
datafile copy filename=/home/oracle/oradata/db10g/undotbs01.dbf recid=7 stamp=596369439
deleted datafile copy
datafile copy filename=/home/oracle/oradata/db10g/sysaux01.dbf recid=8 stamp=596369440
deleted datafile copy
datafile copy filename=/home/oracle/oradata/db10g/users01.dbf recid=9 stamp=596369440
Deleted 4 objects
RMAN> exit
Recovery Manager complete.
REMOVE THE OLD ONLINE REDO LOGS FILES PHYSICALLY:
[oracle@node1-pub oracle]$ rm /home/oracle/oradata/db10g/redo*.log
[oracle@node1-pub oracle]$ sqlplus "/ as sysdba"
SQL*Plus: Release 10.2.0.1.0 - Production on Fri Jul 21 11:29:56 2006
Copyright (c) 1982, 2005, Oracle. All rights reserved.
Connected to:
Oracle Database 10g Enterprise Edition Release 10.2.0.1.0 - Production
With the Partitioning, OLAP and Data Mining options
Enable the block change tracking:
SQL> ALTER DATABASE ENABLE BLOCK CHANGE TRACKING;
Database altered.
SQL>Labels: Migrating Oracle10g DB to ASM |
posted by Srinivasan .R @ 1:17 AM  |
|
|
|
| Tuesday, May 26, 2009 |
| Install Oracle 11g RAC On Linux |
Step By Step Instructions on Installing Oracle 11g Clusterware Software (11.1.0.6) 32-bit on CentOS EL 4 Update 5 x86.
This document explains the step by step process of installing Oracle 11g R (11.1.0.6) Clusterware Software.
Installing Oracle11g (11.1.0.6) Clusterware Software:
Task List:
Setting Up oracle user Environment
Running OUI (oracle Universal Installer) to install 10g RAC Clusterware
Verify CRS status.
Verify Nodeapps status
Setting Up Oracle Environment:
Add the below lines into the .bash_profile under the oracle home directory to set the CRS_HOME in the session.
export CRS_HOME=/u01/app/crs
Running OUI (Oracle Universal Installer) to install Oracle Clusterware:
Complete the following steps to install Oracle Clusterware on your cluster.
You need to run the runInstaller from ONLY ONE node (any single node in the cluster).
Start the runInstaller command as oracle user from any one node When OUI displays the Welcome page, click Next
Xlib: connection to ":0.0" refused by server
Xlib: No protocol specified
Can't connect to X11 window server using ':0.0' as the value of the DISPLAY variable.
If you get the above error, please execute the below command as root and then start the runInstaller by connecting as oracle.
[root@node1-pub ~]# xhost +
access control disabled, clients can connect from any host
[root@node1-pub ~]# su - oracle
[oracle@node1-pub ~]$ /mnt/cdrom/runInstaller
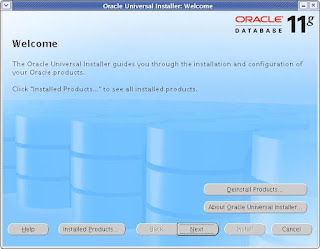
CLICK Next
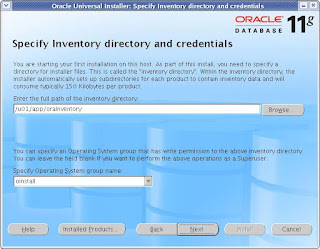
CLICK Next
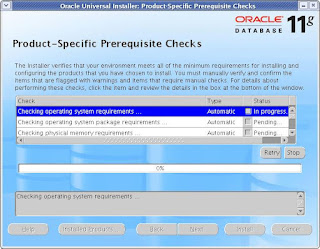
CLICK Next
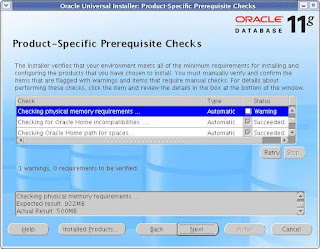
At this step, you shuld not receive any error. If you have configured the Pre-Installation
steps correctly, then you will not get any errors. I get one warning here as you can see which
is complaining about the low memory than required. I had only 512 MB ram and the required memory
is 1GB but I would not worry about this warning and will check the status box.
CLICK Next
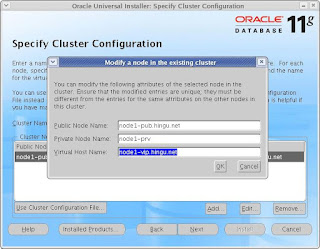
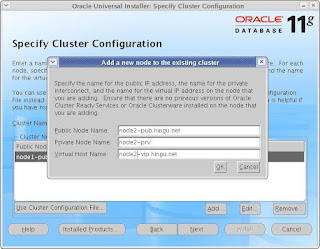
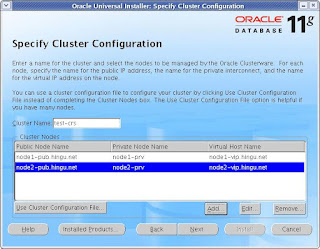
I have entered the fully qualified name for the public hostname and vip hostname. If you do not have registerd domain (like hingu.org)
then, you can simply enter the nodename without having domain name appended to that.
For example node1-pub instead of node1-pub.hingu.net
CLICK Next
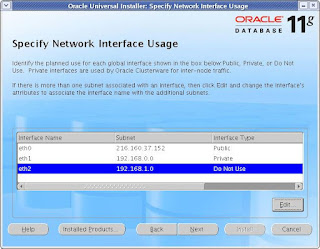
Check whether the interface has correct subnetmask and type associated to it. If you have configured the
network for all the nodes correctly as explained in Pre-Installation task, then you would not get any
error message at this step.
CLICK Next
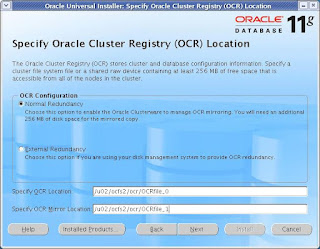
Enter the filename and location (mount point) for the OCR file. In the Pre-Instalation steps, I have configured
ocfs for this file to store. I have used the same mount point (/u02/oradata/ocr) to store them.
I have chosen the External redundancy just for exteriment purpose. On production server, You make sure that
you have one extra mountpoint created on separate physical device to store the morror file
to avoid SPF (Single Point Of Failure).
CLICK Next
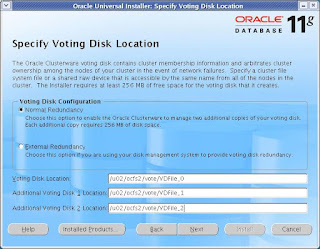
Use the same mount point as OCR file and enter the filename you want for Voting Disk file.
If you choose the External Redundancy, then you need to mention only one location.
CLICK Next
CLICK Next
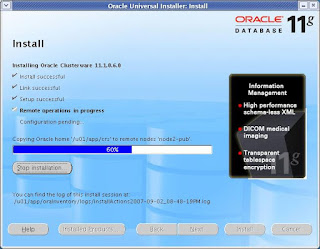
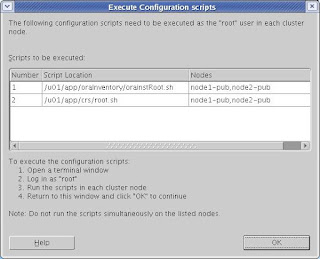
When you execute the above scripts on all the nodes, you should get the below output.
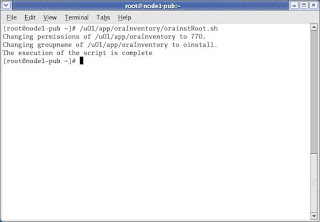
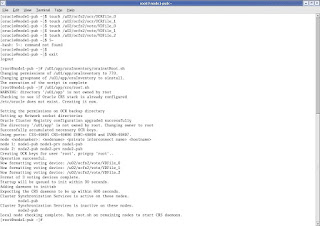
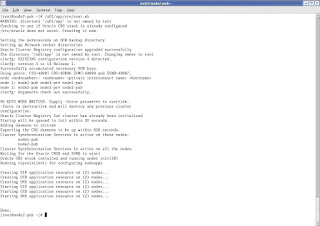
CLICK Next
At the below step, the Oracle Cluster Verification Utility gets failed becuase CentOS is not a certified
Linux OS for the 11g RAC installation. Simply Ignore this error and continue.
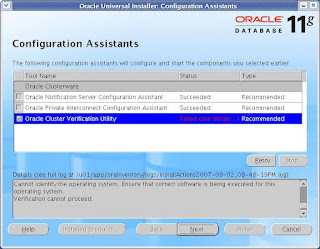
CLICK Exit
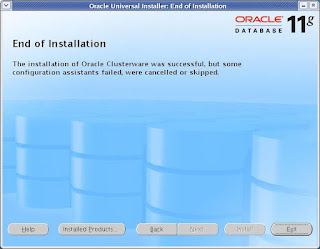
Verifying CRS status:
The below commands can be used to verify the CRS status.
crsctl check crs <<-- for the local node
crsctl check cluster <<-- for remote nodes in the cluster
[root@node1-pub ~]# crsctl check crs
Cluster Synchronization Services appears healthy
Cluster Ready Services appears healthy
Event Manager appears healthy
[root@node1-pub ~]#
crsctl check cluster <<-- for remote nodes in the cluster
For this command to run, CSS needs to be running on the local node.
The "ONLINE" status for remote node says that CSS is running on that node.
When CSS is down on the remote node, the status of "OFFLINE" is displayed for that node.
[root@node1-pub ~]# crsctl check cluster
node1-pub ONLINE
node2-pub ONLINE
Verifying Nodeapps Status:
Now, verify that the nodeapps are configured and running by executing the below command.
[oracle@node2-pub dbs]$ crs_stat -t
Name Type Target State Host
------------------------------------------------------------
ora....pub.gsd application ONLINE ONLINE node1-pub
ora....pub.ons application ONLINE ONLINE node1-pub
ora....pub.vip application ONLINE ONLINE node1-pub
ora....pub.gsd application ONLINE ONLINE node2-pub
ora....pub.ons application ONLINE ONLINE node2-pub
ora....pub.vip application ONLINE ONLINE node2-pub
I can also get the same info using below series of command.
srvctl config nodeapps -n node1-pub
srvctl config nodeapps -n node2-pub
srvctl status nodeapps -n node1-pub
srvctl status nodeapps -n node2-pub
[root@node1-pub ~]# srvctl config nodeapps -n node1-pub
VIP exists.: /node1-vip/216.160.37.153/255.255.255.248/eth0
GSD exists.
ONS daemon exists.
Listener exists.
[root@node1-pub ~]# srvctl config nodeapps -n node2-pub
VIP exists.: /node2-vip/216.160.37.157/255.255.255.248/eth0
GSD exists.
ONS daemon exists.
Listener exists.
[root@node1-pub ~]# srvctl status nodeapps -n node2-pub
VIP is running on node: node2-pub
GSD is running on node: node2-pub
Listener is running on node: node2-pub
ONS daemon is running on node: node2-pub
[root@node1-pub ~]# srvctl status nodeapps -n node1-pub
VIP is running on node: node1-pub
GSD is running on node: node1-pub
Listener is running on node: node1-pub
ONS daemon is running on node: node1-pub
[root@node1-pub ~]#Labels: Install Oracle 11g RAC On Linux |
posted by Srinivasan .R @ 6:33 AM  |
|
|
|
| Tuesday, May 19, 2009 |
| Sessions RAC |
Hello Everyone!!!
Displays information on all database sessions for whole RAC.
-- ----------------------------------------------------------------------------------
SET LINESIZE 500
SET PAGESIZE 1000
COLUMN username FORMAT A15
COLUMN machine FORMAT A25
COLUMN logon_time FORMAT A20
SELECT NVL(s.username, '(oracle)') AS username,
s.inst_id,
s.osuser,
s.sid,
s.serial#,
p.spid,
s.lockwait,
s.status,
s.module,
s.machine,
s.program,
TO_CHAR(s.logon_Time,'DD-MON-YYYY HH24:MI:SS') AS logon_time
FROM gv$session s,
gv$process p
WHERE s.paddr = p.addr
AND s.inst_id = p.inst_id
ORDER BY s.username, s.osuser;
SET PAGESIZE 14
-- ----------------------------------------------------------------------------------
Happy Learning,
--SreeneLabels: Sessions RAC |
posted by Srinivasan .R @ 3:24 AM  |
|
|
|
|
| Monitor Memory RAC |
Hello Everyone!!!
Displays memory allocations for the current database sessions for the whole RAC.
-- ----------------------------------------------------------------------------------
SET LINESIZE 200
COLUMN username FORMAT A20
COLUMN module FORMAT A20
SELECT a.inst_id,
NVL(a.username,'(oracle)') AS username,
a.module,
a.program,
Trunc(b.value/1024) AS memory_kb
FROM gv$session a,
gv$sesstat b,
gv$statname c
WHERE a.sid = b.sid
AND a.inst_id = b.inst_id
AND b.statistic# = c.statistic#
AND b.inst_id = c.inst_id
AND c.name = 'session pga memory'
AND a.program IS NOT NULL
ORDER BY b.value DESC;
-- ----------------------------------------------------------------------------------
Happy Learning,
--SreeneLabels: Monitor Memory RAC |
posted by Srinivasan .R @ 3:19 AM  |
|
|
|
|
| Lists all locked objects for whole RAC |
Hello Everyone!!!
Lists all locked objects for whole RAC.
-- ---------------------------------------------------------------------------------
SET LINESIZE 500
SET PAGESIZE 1000
SET VERIFY OFF
COLUMN owner FORMAT A20
COLUMN username FORMAT A20
COLUMN object_owner FORMAT A20
COLUMN object_name FORMAT A30
COLUMN locked_mode FORMAT A15
SELECT b.inst_id,
b.session_id AS sid,
NVL(b.oracle_username, '(oracle)') AS username,
a.owner AS object_owner,
a.object_name,
Decode(b.locked_mode, 0, 'None',
1, 'Null (NULL)',
2, 'Row-S (SS)',
3, 'Row-X (SX)',
4, 'Share (S)',
5, 'S/Row-X (SSX)',
6, 'Exclusive (X)',
b.locked_mode) locked_mode,
b.os_user_name
FROM dba_objects a,
gv$locked_object b
WHERE a.object_id = b.object_id
ORDER BY 1, 2, 3, 4;
SET PAGESIZE 14
SET VERIFY ON
-- ----------------------------------------------------------------------------------
Happy Learning,
--SreeneLabels: Lists all locked objects for whole RAC |
posted by Srinivasan .R @ 2:01 AM  |
|
|
|
| Wednesday, May 6, 2009 |
| Concurrent Managers |
Hello Everyone!!!
Concurrent Managers
Concurrent Manager:
It is a component of your applications concurrent processing facility that monitor and run time consuming tasks without tying up your terminal. Whenever you submit a request, such as running a report, a concurrent manager does the work for you, letting you perform many tasks simultaneously. It is a daemon program running continuously in the background for e.g. a Unix shell script
Concurrent Process:
A task in the process of completing. Each time you submit a task, a new concurrent process is created. A concurrent process runs simultaneously with other concurrent processes (and other activities on your computer) to help you complete multiple tasks at once with no interruptions to your terminal.
Concurrent Queue:
A list of concurrent requests awaiting completion by a concurrent manager. Each concurrent manager has a queue of requests waiting in line.
Concurrent Request:
A request to complete a task for you. You issue a request whenever you submit a task, such as running a report. Once you submit a task, the concurrent manager automatically takes over for you, completing your request without further involvement from you, or interruption to your work. Concurrent managers process your request according to when you submit the request and the priority you assign to your request. If you do not assign a priority to your request, the application automatically prioritizes the request for you.
Internal Concurrent Manager — The master manager is called the Internal Concurrent Manager (ICM) because it controls the behavior of all of the other managers, and because the ICM is the boss, it must be running before any other managers can be activated. The main functions of the ICM are to start up and shutdown the individual concurrent managers, and reset the other managers after one them has a failure.
Standard Manager — Another important master Concurrent Manager is called the Standard Manager (SM). The SM functions to run any reports and batch jobs that have not been defined to run in any specific product manager. Examples of specific concurrent managers include the Inventory Manager, CRP Inquiry Manager, and the Receivables Tax Manager.
Conflict Resolution Manager — The Conflict Resolution Manager (CRM) functions to check concurrent program definitions for incompatibility rules. However, the ICM can be configured to take over the CRM's job to resolve incompatibilities.
Identifying Oracle Process ID and Dictionaries
The main tables or the data dictionaries of Oracle Apps are the following, using which we can query to find the status of any of the Concurrent Requests or Programs.
FND_CONCURRENT_PROCESSES
FND_CONCURRENT_PROGRAMS
FND_CONCURRENT_REQUESTS
FND_CONCURRENT_QUEUES.
In order to identify a Request that is running in the Oracle Application side, we can query the FND_CONCURRENT_REQUESTS table or the V$SESSION and the V$PROCESS table. While doing this, we need the Process Id at the OS level, the Process ID at the Oracle database tier and also the Process ID at the Application tier.
Identifying a Running Process
Session ID :
Session ID is the Identification number of the Process at the Database Side. The value for this field can be obtained by querying the V$SESSION view. This is given by the field SID.
Process ID and SPID:
The Process ID or the PID is the number of the Process at the OS level and the SPID is the identification number for the Process at the Application level. These values can be obtained by querying the V$PROCESS view.
Request ID:
Request ID is the ID of the Concurrent request or the Program that has been submitted at the Application tier. This field is denoted by the REQUEST_ID field and can be obtained by querying the FND_CONCURRENT_REQUESTS view.
PHASE_CODE and STATUS_CODE :
These two columns gives the value of the Phase and the Status Code of the concurrent request that is running in the Application end. Some of the different Status Code and Phase code and their meanings are as follows:
Phase code
C - Completed
C - Completed
P - pending
R - Running
Status code
D - Cancelled
C - Normal
Q - standby
W - paused
We can get the Oracle Process ID and the OS Process ID for a particular request that is running in the Application end by querying the FND_CONCURRENT_REQUESTS View also. The fields ORACLE_PROCESS_ID , and OS_PROCESS_ID represent the same in the FND_CONCURRENT_REQUESTS dictionary view.
E.g. In order to kill a particular request that is running, we can obtain the Process ID and other details using the below mentioned SQL query .. :
SQL> select Phase_code, status_code,REQUEST_ID,ORACLE_ID, ORACLE_PROCESS_ID, OS_PROCESS_ID from fnd_concurrent_requests where REQUEST_ID=;
After identifying the Process ID and the OS ID, we can kill the particular request or the Process using the normal OS command. E.g.. KILL .
Happy Learning
--ChandruLabels: Concurrent Managers |
posted by Srinivasan .R @ 12:48 AM  |
|
|
|
|
|
