|
| Wednesday, April 29, 2009 |
| Backup Recovery |
Hello Everyone!!!
Backup Recovery
Closed Database Recovery Steps
Restore the damaged files from backup.
SQL> startup mount
SQL> recover database
SQL> alter database open
Offline Tablespace Recovery Steps
Restore the damaged files from the backup.
SQL> startup mount
SQL> alter datafile '/u01/oradata/users01.dbf' offline;
SQL> alter tablespace users offline;
SQL> recover tablespace users;
SQL> alter tablespace users online;
Offline Datafile Recovery Steps
Restore the damaged files from the backup.
SQL> Startup mount
SQL> alter datafile '/u01/oradata/users01.dbf' offline;
SQL> alter database open;
SQL> alter tablespace users offline;
SQL> recover datafile '/u01/oradata/users01.dbf';
SQL> alter tablespace users online;
Cancel-Based Recovery Steps
Restore the damaged files from the backup.
SQL> startup mount
SQL> recover database until cancel using backup controlfile ;
SQL> alter database open resetlogs
Perform a full backup of database.
Change-Based Recovery Steps
Restore the damaged files from the backup.
sql> startup mount
sql> recover database until change 2315 using backup controlfile
sql> alter database open resetlogs
Time-Based Recovery Steps
Restore the damaged files from the backup.
SQL> startup mount
SQL> recover database until time using backup controlfile ;
SQL> recover database until time '2009-01-01:12:00:00' using backup controlfile
SQL> alter database open resetlogs
Perform a full backup of the database
TIPS
System Tablespace Versus a Non-System Tablespace Recovery
-----------------------------------------------------------------------------
When a system data file is lost or damaged, the only way to recover
the database is by doing a closed database recovery using RECOVER
DATABASE command.
Checking for Files Needing Recovery
----------------------------------------------------------
select b.name, a.error from v$recover_file a, v$datafile b
where a.file# = b.file# ;
Happy Learning
--SreeneLabels: Backup Recovery |
posted by Srinivasan .R @ 4:46 AM  |
|
|
|
|
| RMAN Setup |
Hello Everyone!!!
Setup RMAN User, Catalog & Register
-----------------------------------------
MAKE SURE ALL DATABASE have PASSWORD FILE
sqlplus system/manager@rman <<__1
drop user rman_TEST cascade;
create user rman_TEST identified by rman_TEST
default tablespace users
temporary tablespace ts_temp
quota unlimited on users
quota unlimited on ts_temp ;
grant connect , resource, recovery_catalog_owner to rman_TEST;
exit
__1
# create the catalog
rman catalog rman_TEST/rman_TEST@rman << __2
create catalog;
exit
__2
rman target \"sys/pass9999@TEST as sysdba\" \
catalog rman_TEST/rman_TEST@rman << __3
register database ;
EXIT
__3
Full Backup Script – Hot Backup – Target DB in Archivelog Mode
-------------------------------------------------------------------
run {
allocate channel c1 type disk;
set limit channel c1 kbytes 500000;
backup full
filesperset 2
(database format '/rman_backup/BACKUP/TEST_data_%U');
sql "alter system archive log current";
backup filesperset 10
format '/rman_backup/BACKUP/TEST_arch%U'
(archivelog all );
release channel c1;
}
exit;
Incremental Backup Script
------------------------------
resync catalog;
change archivelog all validate;
run{
allocate channel c1 type 'SBT_TAPE';
allocate channel c2 type 'SBT_TAPE';
backup
format '/intr/cf_t%t_s%s_p%p'
(current controlfile);
backup
incremental level 0
tag db_intr_0
filesperset 5
format '/intr/df_t%t_s%s_p%p'
(database);
sql 'alter system archive log current';
backup
filesperset 20
format '/intr/rl_t%t_s%s_p%p'
(archivelog all delete input);
release channel c1;
release channel c2;
}
Full Backup Script – To Tape
--------------------------------
run {
allocate channel t1 type 'SBT_TAPE';
backup
format 'db_%d_t%t_s%s_p%p'
(database);
sql 'alter system archive log current';
backup
format 'arch_%d_t%t_s%s_p%p'
(archivelog all delete input);
}
Recover Specific Datafile
-----------------------------
run
{
allocate channel c1 type disk;
sql 'alter database datafile 2 offline drop';
restore datafile 2;
recover datafile 2;
release channel c1;
}
COMPLETE RECOVERY script using current controlfile
-------------------------------------------------------
run {
allocate channel d1 type disk;
restore database;
sql 'alter database mount';
recover database;
}
INCOMPLETE RECOVERY script using backup controlfile
--------------------------------------------------------
-- Required if there are gaps in log sequence
run {
SET UNTIL logseq = 6 thread = 1;
allocate channel d1 type disk ;
restore controlfile;
restore database;
sql 'alter database mount';
recover database;
sql 'alter database open resetlogs';
}
COMPLETE RECOVERY script using backup controlfile
------------------------------------------------------
run {
allocate channel d1 type disk;
restore controlfile;
restore database;
sql 'alter database mount';
recover database;
sql 'alter database open resetlogs';
}
INCOMPLETE RECOVERY script using backup controlfile
--------------------------------------------------------
-- Required if there are gaps in log sequence
run {
# recover database until specific time
allocate channel dev1 type 'SBT_TAPE';
set until time 'Apr 20 2003 12:15:00';
sql "alter database mount" ;
restore database;
switch datafile all;
recover database;
sql "alter database open resetlogs";
release channel dev1;
}
Happy Learning
--SreeneLabels: RMAN Setup |
| posted by Srinivasan .R @ 4:23 AM |
|
|
|
| Tuesday, April 28, 2009 |
| Change hostname in Linux |
Hello Everyone!!!
First you need to find out your hostname, you can do this with
$ hostname
localhost.localdomain
$
Edit /etc/hosts
You need to edit /etc/hosts and add a line for your host name
$ cat /etc/hosts
# Do not remove the following line, or various programs
# that require network functionality will fail.
127.0.0.1 localhost.localdomain localhost
$
My new server IP is 72.232.196.90, i need to assign it hostname server12.hosthat.com, to do this, i have edited /etc/hosts as follows.
# Do not remove the following line, or various programs
# that require network functionality will fail.
127.0.0.1 localhost.localdomain localhost
72.232.196.90 server12.hosthat.com server12
Edit /etc/sysconfig/network
First lets see what is in the file
$ cat /etc/sysconfig/network
NETWORKING=yes
HOSTNAME=localhost.localdomain
$
To change servers hostname to server12.hosthat.com, change the file as follows.
$ cat /etc/sysconfig/network
NETWORKING=yes
HOSTNAME=server12.hosthat.com
$
Now you need to reboot the server to change the hostname.
Happy Learning
--SreeneLabels: Change hostname in Linux |
| posted by Srinivasan .R @ 5:30 AM |
|
|
|
| Monday, April 20, 2009 |
| Clone Apps 11i Instance |
11i Cloning
Prerequisites
STEP :1
Oracle Universal Installer 2.2.0.19
Perl 5.005
JRE 1.1.8
JRE 1.3.1
JDK 1.3.1
Zip 2.3
OS utilities
OS utilities
(see 11i Install Manual) must be in
the the PATH when running adcfgclone.pl
(Unix: make,ld,cc,ar - Windows: gnumake,link,cc,cmd)
STEP: 2
Apply the Rapid Clone patch
3453499 in the Application Tier Administration node (as the APPLMGR user):
o Log in to the APPL_TOP environment (source the environment file)
o Create appsutil.zip file
perl AD_TOP/bin/admkappsutil.pl
o This will create appsutil.zip in $APPL_TOP/admin/out
* On the Database Tier (as the ORACLE user):
o Copy or FTP the appsutil.zip file to the
o cd RDBMS ORACLE_HOME
unzip -o appsutil.zip
STEP :3
Clone Oracle Applications 11i
Prepare the source system database tier for cloning
Log on to the source system as the ORACLE user and run the following commands:
cd RDBMS ORACLE_HOME/appsutil/scripts/CONTEXT_NAME
perl adpreclone.pl dbTier
Prepare the source system application tier for cloning
Log on to the source system as the APPLMGR user and run the following commands on each node that contains an APPL_TOP:
cd COMMON_TOP/admin/scripts/CONTEXT_NAME
perl adpreclone.pl appsTier
STEP :4
Copy the Source System to the Target System
Copy the application tier file system
APPL_TOP
OA_HTML
OA_JAVA
OA_JRE_TOP
COMMON_TOP>/util
COMMON_TOP>/clone
COMMON_TOP>/_pages (when this directory exists)
806 ORACLE_HOME
iAS ORACLE_HOME
Copy the database tier file system
# Copy the database (DBF) files from the source to the target system
# Copy the source database ORACLE_HOME to the target system
STEP : 5
Configure the Target System
Configure the target system database server
Log on to the target system as the ORACLE user and type the following commands to configure and start the database:
cd RDBMS ORACLE_HOME/appsutil/clone/bin
perl adcfgclone.pl dbTier
Configure the target system application tier server nodes
Log on to the target system as the APPLMGR user and type the following commands:
cd COMMON_TOP/clone/bin
perl adcfgclone.pl appsTier
STEP :6
Finishing Task
1. Update profile options
2. Update printer settings (If printers are not configured or you don't want to use printer you can skip this step)
3. Update workflow configuration settings (Important)
For detailed steps check Metalink Note # 230672.1
Happy Learning
--Sreene
Oracle Apps DBALabels: Clone Apps 11i Instance |
| posted by Srinivasan .R @ 11:29 AM |
|
|
|
| Friday, April 17, 2009 |
| Upgrading 9i to 10g with 11i |
Upgrading 9i (9.2.0.6) to 10g (10.1.0.5) with 11i (11.5.10.2) Applications
Installation Steps
Before Upgrade
1. Take a Cold backup of Oracle Home 9.2.0.6 and Oracle Database after shutting down all Processes and Database.
2. Apply Interoperobility patch for 11.5.10 4335078.
2. Apply Auto Config patch (5478710)
3. Gather Optimizer Statistics Before the Upgrade using the scripts below.
Note: This script must be run connected AS SYSDBA using SQL*Plus.
SCRIPT #1
---------
spool gdict
grant analyze any to sys;
exec dbms_stats.gather_schema_stats('WMSYS',options=>'GATHER', estimate_percent => DBMS_STATS.AUTO_SAMPLE_SIZE, method_opt => 'FOR ALL COLUMNS SIZE AUTO', cascade => TRUE);
exec dbms_stats.gather_schema_stats('MDSYS',options=>'GATHER', estimate_percent => DBMS_STATS.AUTO_SAMPLE_SIZE, method_opt => 'FOR ALL COLUMNS SIZE AUTO', cascade => TRUE);
exec dbms_stats.gather_schema_stats('CTXSYS',options=>'GATHER', estimate_percent => DBMS_STATS.AUTO_SAMPLE_SIZE, method_opt => 'FOR ALL COLUMNS SIZE AUTO', cascade => TRUE);
exec dbms_stats.gather_schema_stats('XDB',options=>'GATHER', estimate_percent => DBMS_STATS.AUTO_SAMPLE_SIZE, method_opt => 'FOR ALL COLUMNS SIZE AUTO', cascade => TRUE);
exec dbms_stats.gather_schema_stats('WKSYS',options=>'GATHER', estimate_percent => DBMS_STATS.AUTO_SAMPLE_SIZE, method_opt => 'FOR ALL COLUMNS SIZE AUTO', cascade => TRUE);
exec dbms_stats.gather_schema_stats('LBACSYS',options=>'GATHER', estimate_percent => DBMS_STATS.AUTO_SAMPLE_SIZE, method_opt => 'FOR ALL COLUMNS SIZE AUTO', cascade => TRUE);
exec dbms_stats.gather_schema_stats('OLAPSYS',options=>'GATHER', estimate_percent => DBMS_STATS.AUTO_SAMPLE_SIZE, method_opt => 'FOR ALL COLUMNS SIZE AUTO', cascade => TRUE);
exec dbms_stats.gather_schema_stats('DMSYS',options=>'GATHER', estimate_percent => DBMS_STATS.AUTO_SAMPLE_SIZE, method_opt => 'FOR ALL COLUMNS SIZE AUTO', cascade => TRUE);
exec dbms_stats.gather_schema_stats('ODM',options=>'GATHER', estimate_percent => DBMS_STATS.AUTO_SAMPLE_SIZE, method_opt => 'FOR ALL COLUMNS SIZE AUTO', cascade => TRUE);
exec dbms_stats.gather_schema_stats('ORDSYS',options=>'GATHER', estimate_percent => DBMS_STATS.AUTO_SAMPLE_SIZE, method_opt => 'FOR ALL COLUMNS SIZE AUTO', cascade => TRUE);
exec dbms_stats.gather_schema_stats('ORDPLUGINS',options=>'GATHER', estimate_percent => DBMS_STATS.AUTO_SAMPLE_SIZE, method_opt => 'FOR ALL COLUMNS SIZE AUTO', cascade => TRUE);
exec dbms_stats.gather_schema_stats('SI_INFORMTN_SCHEMA',options=>'GATHER', estimate_percent => DBMS_STATS.AUTO_SAMPLE_SIZE, method_opt => 'FOR ALL COLUMNS SIZE AUTO', cascade => TRUE);
exec dbms_stats.gather_schema_stats('OUTLN',options=>'GATHER', estimate_percent => DBMS_STATS.AUTO_SAMPLE_SIZE, method_opt => 'FOR ALL COLUMNS SIZE AUTO', cascade => TRUE);
exec dbms_stats.gather_schema_stats('DBSNMP',options=>'GATHER', estimate_percent => DBMS_STATS.AUTO_SAMPLE_SIZE, method_opt => 'FOR ALL COLUMNS SIZE AUTO', cascade => TRUE);
exec dbms_stats.gather_schema_stats('SYSTEM',options=>'GATHER', estimate_percent => DBMS_STATS.AUTO_SAMPLE_SIZE, method_opt => 'FOR ALL COLUMNS SIZE AUTO', cascade => TRUE);
exec dbms_stats.gather_schema_stats('SYS',options=>'GATHER', estimate_percent => DBMS_STATS.AUTO_SAMPLE_SIZE, method_opt => 'FOR ALL COLUMNS SIZE AUTO', cascade => TRUE);
spool off
----------------------- End of script #1 -----------------------
4. SCRIPT #2
--
This script creates the stats table, 'dictstattab' and exports the stats for the RDBMS component schemas into it. The export will give error if a particular component schema does not exist in the database. This can happen if a component is not installed or if it is invalid.
--
-- This will be useful incase you want to import the stats back
-- example:
-- Following stmt imports the stats for SYS schema after
-- deleting the existing stats.
-- exec dbms_stats.delete_schema_stats('SYS');
-- exec dbms_stats.import_schema_stats('SYS','dictstattab');
spool sdict
grant analyze any to sys;
exec dbms_stats.create_stat_table('SYS','dictstattab');
exec dbms_stats.export_schema_stats('WMSYS','dictstattab',statown => 'SYS');
exec dbms_stats.export_schema_stats('MDSYS','dictstattab',statown => 'SYS');
exec dbms_stats.export_schema_stats('CTXSYS','dictstattab',statown => 'SYS');
exec dbms_stats.export_schema_stats('XDB','dictstattab',statown => 'SYS');
exec dbms_stats.export_schema_stats('WKSYS','dictstattab',statown => 'SYS');
exec dbms_stats.export_schema_stats('LBACSYS','dictstattab',statown => 'SYS');
exec dbms_stats.export_schema_stats('OLAPSYS','dictstattab',statown => 'SYS');
exec dbms_stats.export_schema_stats('DMSYS','dictstattab',statown => 'SYS');
exec dbms_stats.export_schema_stats('ODM','dictstattab',statown => 'SYS');
exec dbms_stats.export_schema_stats('ORDSYS','dictstattab',statown => 'SYS');
exec dbms_stats.export_schema_stats('ORDPLUGINS','dictstattab',statown => 'SYS');
exec dbms_stats.export_schema_stats('SI_INFORMTN_SCHEMA','dictstattab',statown => 'SYS');
exec dbms_stats.export_schema_stats('OUTLN','dictstattab',statown => 'SYS');
exec dbms_stats.export_schema_stats('DBSNMP','dictstattab',statown => 'SYS');
exec dbms_stats.export_schema_stats('SYSTEM','dictstattab',statown => 'SYS');
exec dbms_stats.export_schema_stats('SYS','dictstattab',statown => 'SYS');
spool off
----------------------- End of script #2 -----------------------
Note: You can ignore the following errors:
*
ERROR at line 1:
ORA-20000: Schema WMSYS does not exist or insufficient privileges to analyze an
ORA-20000: Schema XDB does not exist or insufficient privileges to analyze an
ORA-20000: Schema WKSYS does not exist or insufficient privileges to analyze an
ORA-20000: Schema LBACSYS does not exist or insufficient privileges to analyze
ORA-20000: Schema DMSYS does not exist or insufficient privileges to analyze an
ORA-20000: Schema SI_INFORMTN_SCHEMA does not exist or insufficient privileges
Database Installation
1. Log in as the Oracle user
2. Prepare to create the 10.2.0 Oracle Home.
Decide where you want to install the 10.2.0 Oracle Home on the database server node. It must be in a different directory than the current Oracle Home.
Example :
$ cd /ebis/proddb
$ mkdir 10.2.0
3. Install Oracle10G Release 10.2.0.1 Database Server. Do not run any migrate scripts at this time
The environment variables DISPLAY, TEMP, TMPDIR, TMP should be set before installing and any reference to the 8.0.6 or 9.2.0 Oracle Homes in the path or environment variables should be removed. OR Remove .env entry from the .profile from oracle user.
(Remove sourcing of environment file from Oracle user profile and login again. Run xhost + as root user)
Install Server Version 10.1.0.2
Note: This may differ slightly from your prompts depending on the installation media.
Steps:
$ . runInstaller
Check "Advanced Installation" checkbox on the “Welcome” screen
Click the [Next] button
Choose a new ORACLE_HOME Name (i.e. APPS10G_)
Verify the location of the Oracle Home
Click the [Next] button
Click the [Next] button to accept the “Enterprise Edition” installation
Review the success of "Product Specific Pre-requisites"
Click the [Next] button
Note: You will not be upgrading an existing Database at this time
Choose the “Do not create a starter Database” radio button
Click the [next] button
Click the [Install] button at the “Summary” screen
Run the “root.sh” scripts when prompted
Click [Ok] to continue after running the script
Click ‘Exit’ to acknowledge the end of installation
Click the (yes] button leave the installer
THEN INSTALL THE COMPANIAN CD
./runinstaller
SELECT THE SAME ORACLE HOME (10g oracle home)
Select 10g products à next
Run root.sh
Finish the installations.
PATCH SET 10.1.0.5 INSTALLATION
a) Set the environment
b) Set .profile OR
export ORACLE_SID=PROD
export ORACLE_HOME=<10.1.0 ORACLE_HOME>
export PERL5LIB=$ORACLE_HOME/perl/lib/5.8.3
export PATH=$ORACLE_HOME/bin:$ORACLE_HOME/perl/bin:$PATH
c) Unzip the patch in $ORACLE_HOME
d) CD Disk1
e) ./runinstaller
f) run root.sh
g) Create nls/data/9idata directory
On the database server node, as the owner of the Oracle RDBMS file system and database instance, run the $ORACLE_HOME/nls/data/old/cr9idata.pl script to create the $ORACLE_HOME/nls/data/9idata directory.
After creating the directory, make sure that the ORA_NLS10 environment variable is set to the full path of the 9idata directory whenever you perform steps involving the 10g Oracle home.
Steps:
export ORACLE_SID=PROD
export ORACLE_HOME=<10.1.0 ORACLE_HOME>
export PERL5LIB=$ORACLE_HOME/perl/lib/5.8.3
export PATH=$ORACLE_HOME/bin:$ORACLE_HOME/perl/bin:$PATH
h)
i) cd $ORACLE_HOME/nls/data/old
perl cr9idata.pl
The following will message appear:
Please reset environment variable ORA_NLS10 to /ebis/proddb/10.2.0/nls/data/9idata!
Prepare to Upgrade
1.Check the free space on the SYSTEM tablespace. There should be at least 500MB of free space. Temporary tablespace 2GB
$ sqlplus system/manager
select nvl(sum(bytes)/1024,0) as "System Tablespace Avail(KB)"
from dba_free_space
where tablespace_name like '%SYSTEM%';
Note: If it is necessary to add a Datafile use a statement similar to the following:
ALTER TABLESPACE system
ADD DATAFILE '/apps2/oracle/proddata/system07.dbf'
SIZE 750M
AUTOEXTEND ON NEXT 10M MAXSIZE UNLIMITED;
Apply OPATCH 2617419
Create soft link
Ln –s /usr/sbin/fuser /sbin/fuser
Unzip the patch into $ORACLE_HOME
APPLY PATCH 4605877
DON’T PERFORM SPECIAL INSTRUCTION IN SPECIFIED IN THE PATCH README.
SHUTDOWN THE OLD (9I)LISTENER
NOTE: Database should be up and running.
CREATE 10G LISTENER
Netca
Give the same instance name as PROD and port as same port.
Upgrade the Database
1.Shutdown all processes running out of the 9.2.0.6 ORACLE_HOME
2.only the database shold be UP and Running.
2.Set your environment variables
export ORACLE_SID=VIS
export ORACLE_HOME=/apps/visdb/10.1.0
export PERL5LIB=$ORACLE_HOME/perl/lib/5.8.3
export PATH=$ORACLE_HOME/bin:$ORACLE_HOME/perl/bin:$PATH
3.Start the Database Upgrade Assistant
Steps:
dbua
Click the [next) button
Select the Database to upgrade
Click the [next) button
Choose the size for the SYSAUX tablespace
[ We recommend that you use 500 MB as the SYSAUX tablespace size. Set autoextend on for the SYSAUX tablespace.] after upgrade it will take around 7-8 GB depends on your DB size. Please make sure you have sufficient space in that directory.
Click the [next) button
Remove the check for the option to “Recompile Invalid Objects”. This will be during at a later step. If you want the dbua compiles your invalid objects then check the check box(but it will take time to10hr)
Click the [next) button
Decide on you “Backup” strategy
Click the [next) button
Decide on your Management Options
Click the [next) button
Review the “Summary” screen
Click the (Finish) button
You may disable the compilation of objects as that is done at a later step.
Click the (Ok) button to acknowledge completion of the upgrade
Review the upgrade results
Decide on your option to configure “Database Passwords”
Decide on your option to “Restore the Database” if you are not satisfied with your upgrade results.
Click the (Close) button to end the upgrade
Note: The following changes are noted in the summary:
A spfile.ora is created
Large_pool_size = 8388608
Shared_pool_size was changed from 301989888 to 335544320
The following parameters were removed:
- optimizer_max_permutations
- row_locking
- undo_supress_errors
- max_enabled_roles
Adjust the Database parameters
1. Alter Database parameters as suggested in Note: 216205.1
New initPROD.ora file will be available in 10.2.0.1 ORACLE_HOME/dbs directory.
Make the below changes in the initPROD.ora and restart the 10.2.0.1 database.
2.Modify the location of the DUMP files
a) Create the new locations for the dump files
b) Alter the dump locations
3.Modify the location of the directory for UTL_FILE_DIR
a) Create the new locations for UTL_FILE_DIR secondary directory
cd $ORACLE_HOME/appsutil
mkdir outbound
mkdir
b) Alter the UTL_FILE_DIR secondary location
4.Run utlrp to compile Invalid Objects
The utlrp.sql script recompiles all existing PL/SQL modules that were previously in an INVALID state, such as packages, procedures, types and so on. These actions are optional; however, they ensure that the cost of recompilation is incurred during installation rather that in the future.
To run the utlrp.sql script, complete the following steps:
a) Change to the ORACLE_HOME/rdbms/admin directory.
b) Login as a user with SYSDBA privileges.
c) Run the utlrp.sql
Note: This scripts will take several hours to run
7. Check for Installation of Oracle XML DB
select count(1) from dba_registry where comp_id='XDB';
After the Database upgrade
Gather statistics for SYS schema for this the free temporary tablespace should be more give 6 to 8gb
Steps:
$ sqlplus "/ as sysdba"
SQL> shutdown normal;
SQL> startup restrict;
SQL> @adstats.sql
SQL> shutdown normal;
SQL> startup;
SQL> exit;
Start the New Database listener.
Migrate the 9.2.0.6 CONTEXT_NAME directory to the 10.2.0 network/admin directory
Modify the listener.ora, tnsnames.ora and sqlnet.ora to replace the 9.2.0 references with 10.2.0
Setup the environment
export TNS_ADMIN=/apps/visdb/10.1.0/network/admin/
export ORACLE_SID=PROD
export ORACLE_HOME=/ebis/proddb/10.1.0
export PERL5LIB=$ORACLE_HOME/perl/lib/5.8.3
export PATH=$ORACLE_HOME/bin:$ORACLE_HOME/perl/bin:$PATH
lsnrctl start
Run adgrants.sql (Conditional)
If you have at least AD.I or Applications release 11.5.10 installed on your system, copy $APPL_TOP/admin/adgrants.sql from the administration server node to the database server node. Use SQL*Plus to connect to the database as SYSDBA and run the script using the following command:
sqlplus "/ as sysdba" @adgrants.sql
Grant create procedure privilege on CTXSYS
From the administration server node, use SQL*Plus to connect to the database as APPS and run the following command:
sqlplus apps/ @$AD_TOP/patch/115/sql/adctxprv.sql \
CTXSYS
Manually migrate files for the 10.2.0 environment
Note:-- carefully change all the environment whichever showing the 9i oracle home to 10g
Migrate the 9.2.0.6 .env to the 10.2.0 ORACLE_HOME and modify the environment file changing the 9.2.0 references to 10.2.0
Note: Global replace command for vi editor
:g/9.2.0/s//10.1.0/g
Implement and run Autoconfig on the new Database home
1. Copy AutoConfig to the RDBMS ORACLE_HOME
Update the RDBMS ORACLE_HOME file system with the AutoConfig files by performing the following steps:
Steps:
* On the Application Tier (as the APPLMGR user):
a) Log in to the APPL_TOP environment and source the APPSORA.env file
b) Create appsutil.zip file. This will create appsutil.zip in $APPL_TOP/admin/out
perl $AD_TOP/bin/admkappsutil.pl
c) Copy or FTP the appsutil.zip file to the
* On the Database Tier (as the APPLMGR or ORACLE user):
d) cd
e) Source <10.2.0 CONTEXT_NAME.env> file
f) unzip -o appsutil.zip
2. Generate your Database Context File. Execute the following commands to create your Database Context File:
Steps:
a) cd
b) . .env
c) cd <10.2.0 ORACLE_HOME>/appsutil/bin
d) perl adbldxml.pl tier=db appsuser= appspasswd=
Attention: adbldxml uses your current environment settings to generate the context file. Therefore ensure that your environment is correctly sourced.
3. Generate and Apply AutoConfig Configuration files
Attention: This step performs the conversion to AutoConfig. Once completed, the previous configuration will not be available.
Attention: The database server and the database listener must remain available during the AutoConfig run. All the other database tier services should be shut down.
Execute the following commands:
Steps:
a) cd /appsutil/bin
b) adconfig.sh contextfile= appspass=
Note: Running AutoConfig might change your existing environment files. After running AutoConfig, you should always set the environment before you run any Applications utilities in order to apply the changed environment variables.
Recreate Grants and Synonyms
Steps:
cd $APPL_TOP
. APPSORA.env
adadmin
Choose Menu Item #4 -Maintain Applications Database Entities menu
Choose Sub Menu Item #2 - Re-create grants and synonyms for APPS schema
Choose the number of workers
Restart Applications
Steps:
cd $APPL_TOP
. APPSORA.env
cd $APPLCSF/scripts/$CONTEXT_NAME
. adstrtal.sh apps/
Metalink Documents referred:
1.282038.1 Oracle Applications Release 11i with Oracle Database 10g Release 1 (10.1.0)
2.362202.1 Interoperability Notes Oracle Applications Release 11i with Oracle Database 10g Release 1 (10.1.0)
3.216205.1 - Database Initialization Parameters and Configuration for Oracle Applications 11i.
4.165195.1 - Using Autoconfig to Manage System Configurations with Oracle Applications 11i
5. Note:359483.1-- Upgrading Oracle Server 9.2.0.6 to 10.1.0.4 in an 11.5.10.2 Applications EnvironmentLabels: Upgrading 9i to 10g with 11i |
| posted by Srinivasan .R @ 5:09 AM |
|
|
|
|
| Upgrade from 11.5.10.2 to R12 |
Upgrade Oracle Applications from 11.5.10.2 to R12
System Overview
Version 11.5.10.2
Oracle Applications Vision Instance
OS: Redhat Linux update 5
Type: Single Node instance
Applications OS User: applmgrupd
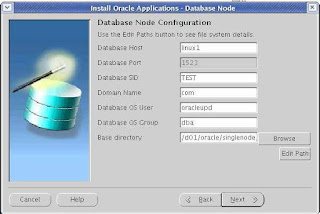
Installed directory: /d01/oracle/singlenode
Database 9i OS User : oracleupd
9i Database Home = /d01/oracle/singlenode/testdb/9.2.0
10g Database Home = /d01/oracle/singlenode/testdb/10.2.0
Instance SID: TEST
Host: linux1
Task – To Upgrade Oracle Applications 11.5.10.2 to R12
Note: Please use vision instance as it is already Multi-Org, Multi-Org is mandatory in R12
Note: The below upgrade is only for testing purposes, not to be implemented in production servers, please do refer metalink for more information.
Upgrade path
• Applications R11.5.6 and below requires to first upgrade to R11.5.10.2/10gR2
• Applications R11.5.7 and up can be directly upgraded to R12
• Database in all releases must have been upgraded to 10gR2 (11.5.9.2 / 11.5.10.2) or should be done during upgrade to R12 (11.5.9.1/11.5.10.1 and below
Here are steps to upgrade Oracle Application 11.5.10.2 to R12, let’s split the activity into 6 steps
1> Please do upgrade the database from 9.2.0.6 to 10.2.0.3, the steps are available in the below link
2> Apply the below patches in your existing 11.5.10.2 environment
Shut down the entire E-Business Suite environment and perform a full backup
4712852 - Minipack 11i.AD.I.4
5753359 - ALPPNR, NO RESPONSE ACTION PROCESSOR CONC PGM ENDS IN ERROR
5467526 - OATM MIGRATION UTILITY: ORA-22853 IN ERROR LOG
5120936 - TUMS for R12: TO DELIVER TUMS UTILITY FOR UPGRADES FROM 11I TO R12
5726010 - AD Preparation Scripts for R12
3> Run rapidwiz to create R12 code tree
4> Apply the below patches in R12 environment
4502962 – R12 Minipack
5> Configuration Phase – R12
6> Apply the online help
2> Apply the below patches in your existing 11.5.10.2 environment
4712852 - Minipack 11i.AD.I.4
5753359 - ALPPNR, NO RESPONSE ACTION PROCESSOR CONC PGM ENDS IN ERROR
*5467526 - OATM MIGRATION UTILITY: ORA-22853 IN ERROR LOG
5120936 - TUMS for R12: TO DELIVER TUMS UTILITY FOR UPGRADES FROM 11I TO R12
5726010 - AD Preparation Scripts for R12
Enable the maintenance mode
adadmin defaultsfile=$APPL_TOP/admin/$TWO_TASK/adalldefaults.txt logfile=adadmin.log
menu_option=ENABLE_MAINT_MODE workers=4
-- Apply Patch 4712852
unzip p4712852_11i_LINUX.zip
cd 4712852
-- Takes 5 minutes
adpatch defaultsfile=$APPL_TOP/admin/$TWO_TASK/adalldefaults.txt logfile=4712852.log
patchtop=/software/upgrades/11.5.10.2toR12/r11/4712852 driver=u4712852.drv workers=4
-- Apply patch u5753359.drv
unzip p5753359_11i_LINUX.zip
-- Takes 2 minutes
adpatch defaultsfile=$APPL_TOP/admin/$TWO_TASK/adalldefaults.txt logfile=5753359.log
patchtop=/software/upgrades/11.5.10.2toR12/r11/5753359 driver=u5753359.drv workers=4
-- Apply patch u5467526.drv
unzip p5467526_11i_LINUX.zip
cd 5467526
adpatch defaultsfile=$APPL_TOP/admin/$TWO_TASK/adalldefaults.txt logfile=5467526.log
patchtop=/software/upgrades/11.5.10.2toR12/r11/5467526 driver=u5467526.drv workers=4
-- Apply patch u5120936.drv
unzip p5120936_11i_GENERIC.zip
cd 5120936
adpatch defaultsfile=$APPL_TOP/admin/$TWO_TASK/adalldefaults.txt logfile=5120936.log
patchtop=/software/upgrades/11.5.10.2toR12/r12/5120936 driver=u5120936.drv workers=4
cd $AD_TOP/patch/115/sql
sqlplus apps/apps @adtums.sql /usr/tmp
-- Review TUMS report in /usr/tmp
-- Apply patch 5726010
unzip p5726010_11i_GENERIC.zip
cd 5726010/
sqlplus apps/apps @adgncons.sql apps apps
# modify the adcrtbsp.sql to specify the path for new tablespaces
sqlplus system/manager @adcrtbsp.sql
su - oracleupd
mkdir -p $ORACLE_HOME/appsutil/admin
cd $ORACLE_HOME/appsutil/admin
cp /software/upgrades/11.5.10.2toR12/r12/5726010/adgrants.sql .
sqlplus '/ as sysdba' @adgrants.sql applsys
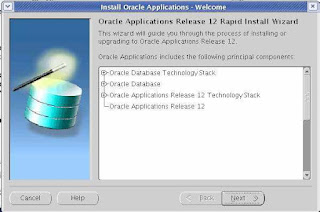
-- Run rapidwiz to create R12 code tree
The installation will install R12 applications components and the database home
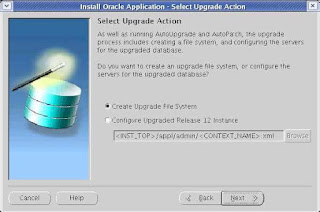
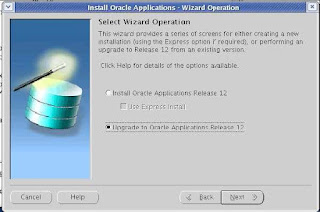
Select upgrade to Oracle Applications R12
Select upgrade actions screen
select create upgrade file system
enter the parameters required to set up your new environment run rapid install Here are the screen shots for the same


The Installation creates APPL_TOP, COMMON_TOP, INST_TOP and 10g Oracle Home
Move the new environment file into .bash_profile
su - applmgrupd
cd /d01/oracle/apps/apps_st/appl
mv .bash_profile .bash_profile_11.5.10
cat APPSVIS_linux1.env >> /home/applmgrupd/.bash_profile
Now onwards, you are connected to R12 application
-- Apply patch AD.A 4502962
-- takes 6 minutes
unzip p4502962_R12_LINUX.zip
cd 4502962/
adpatch
Please enter the name of your AutoPatch driver file: u4502962.drv
-- Run the American English upgrade patch driver
-- Takes 40 hours
cd $AU_TOP/patch/115/driver
adpatch options=nocopyportion,nogenerateportion
Please enter the name of your AutoPatch driver file: u4440000.drv
Run the NLS upgrade patch driver (conditional)
• Download the NLS Release 12 patch (4440000) for each active language in the system.
• Run each driver (u4440000.drv) with adpatch
• NLS patch driver has the same name as the American English patch driver.
Synchronize NLS and American English product patches (conditional)
• Generate manifest using perl $AD_TOP/bin/adgennls.pl
• Backup manifest file $APPL_TOP/admin/$TWO_TASK/out/adgennls.txt
• http://updates.oracle.com/TransSync
• Don’t check Translation Level Updates
• Upload manifest
• Download and apply patch
-- Configuration Phase
Disable maintenance mode
Run autoconfig
Run rapidwiz to configure and start processes
Sign on to R12 applications check concurrent managers
Run autoconfig
su - applmgrupd
perl $AD_TOP/bin/admkappsutil.pl
su - oracleupd
cd $ORACLE_HOME
cp /d01/oracle/inst/apps/TEST_linux1/admin/out/appsutil.zip .
unzip -o appsutil.zip
cd $ORACLE_HOME/appsutil/scripts/TEST_linux1
sh adautocfg.sh
Run rapidwiz to configure and start processes
-----------------------------------------
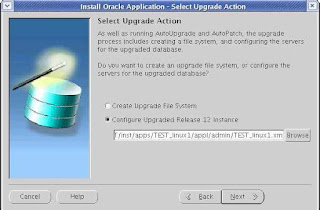
rapidwiz - Upgrade to Oracle Applications Release 12 -> Upgrade Action -> Select Configure Upgraded
Release 12 instance
$INST_TOP/admin/VIS_linux1.xml
/d01/oracle/inst/apps/TEST_linux1/appl/admin/TEST_linux1.xml
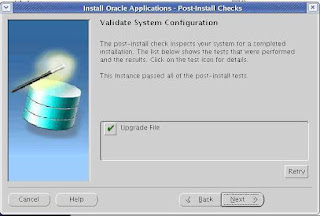
Note: I got the below error, but all services and the application is running.
Sign on to R12 applications check concurrent managers
Connect as sysadmin/sysadmin
-- Apply online help
cd $AU_TOP/patch/115/driver/
adpatch options=hotpatch,nocopyportion,nogenerateportion
Please enter the name of your AutoPatch driver file : u5051400.drv
-- Gather schema statistics for CBO
Release 12 employs cost-based optimization, which examines FND table statistics to determine the most
efficient access paths and join
methods for executing SQL statements. These statistics are gathered by the FND_STATS process, which
you initiate by running the
Gather Schema Statistics concurrent program.
From your Release 11i APPL_TOP, complete the following steps:
1. Log in to Oracle Applications with the System Administrator responsibility.
2. Navigate to the Submit Request window (Request > Run).
3. Submit the Gather Statistics program. (Schema)
References
1. Upgrading Oracle Applications Note# 289788.1
2. Oracle 10gR2 Database Preparation Guidelines for an E-Business Suite R12 Note#403339.1
3. Oracle applications R11.5.10.2 Maintenance pack Installation Note#316365.1
4. Oracle Applications Upgrade Guide: Release 11i to Release 12 Part# B31566-01
5. Database Initialization Parameters for Oracle Applications Release 12 Note#396009.1
6. Oracle Applications Release Notes Release 12 Note# 405293.1
7. E-Business Suite Release 12 Upgrade Sizing and Best Practices Note# 399362.1
8. Upgrading to R12 Note# 414710.1
9. Maintenance Wizard Note# 215527.1Labels: Upgrade from 11.5.10.2 to R12 |
| posted by Srinivasan .R @ 4:06 AM |
|
|
|
|
| How to access EBS in mozile borwser in linux |
To enable the JAVA plugin in the browers...
1. install required JAVA in /usr/java
2.Go the plugin dir of your browser
ex : 1. cd /usr/lib/mozilla/plugins/
2. cd /home/oracle/firefox/plugins/
3.create a link for the file libjavaplugin_oji.so.
ex : ln -s /usr/java/j2sdk1.4.2_04/jre/plugin/i386/ns610/libjavaplugin_oji.so .
or ln -s /usr/java/j2sdk1.4.2_04/jre/plugin/i386/ns610-gcc32/libjavaplugin_oji.so .
4. Try again with the Browser.
these are the steps to access 11i in linux mozilla borwser..
Linux, Mozilla And Oracle Applications 11i
For the benefits of those who has been hunting around for a solution to running Oracle Applications on Linux, here's the steps on how to get it to run on a Redhat based distro :
1. Download the latest Java SDK/JRE from Sun. The latest version is J2SE 1.4.2_01
URL: http://java.sun.com/j2se/1.4.2/download.html
2. Save the downloaded SDK file, j2sdk-1_4_2_01-linux-i586-rpm.bin (approx. 40MB), in a directory.
3. As root, extract the file:
root@linux# ./j2sdk-1_4_2_01-linux-i586-rpm.bin
This will extract the j2sdk-1_4_2_01- linux-i586.rpm file.
4. If you are installing the JDK for the 1st time:
root@linux# rpm -iv j2sdk-1_4_2_01-linux-i586.rpm OR, if upgrading from previous version:root@linux# rpm -Uv j2sdk-1_4_2_01-linux-i586.rpm
5. The installation process will drop the SDK into the /usr/java/j2sdk directory
6. Go to your mozilla plugins directory:root@linux# cd /usr/lib/mozilla/plugins
7. Create a symbolic link to the libjavaplugin_oji.so library. NOTE if your mozilla is 1.3.X, then:root@linux# ln -s /usr/java/j2sdk/jre/plugin/i386/ns610/libjavaplugin_oji.so libjavaplugin_oji.so
If your mozilla is 1.4.X and above: root@linux# ln -s /usr/java/j2sdk/jre/plugin/i386/ns610-gcc32/libjavaplugin_oji.so libjavaplugin_oji.so
8. If your home directory also contain a .mozilla directory, then:
root@linux# cd $HOME/.mozilla/plugins Create another symbolic link to the library as in step 7.
9. Launch Mozilla and type the url to access your Oracle Applications:
http://:/dev60cgi/f60cgi?jinit_mimetype=application/x-java-vm
10. Now sit back and enjoy (or suffer?) Oracle.
Warning: The above steps has not been fully tested and I believe Oracle will not support it. So, use it at your own risk. Cheers and say bye to Microsoft(and BG)Labels: How to access EBS in mozile borwser in linux |
| posted by Srinivasan .R @ 2:58 AM |
|
|
|
|
| Change hostname for E-Business Suite |
Run AutoConfig to change hostname for E-Business Suite
Oracle E-Business Suite is dependent on hostname. User can easily change the IP of the machine, but user cannot anyhow change the hostname of the machine. To change the hostname, we need to run AutoConfig on E-Business Suite.
First, startup dbTier. AppTier is not required at all in the whole process.
FOR DATABASE TIER:
Note:338003.1 How to change the hostname and/or port of the Database Tier using AutoConfig
1. Login as oracle user.
2. De-register the current database server.
perl $ORACLE_HOME/appsutil/bin/adgentns.pl appspass=apps contextfile=$CONTEXT_FILE -removeserver
3. Update AutoConfig Context file with new host information. Edit $CONTEXT_FILE directly.
* Copy $CONTEXT_FILE to a new context file.
cp /opt/oracle/product/10.1.0/db/appsutil/PROD_.xml
/opt/oracle/product/10.1.0/db/appsutil/PROD_.xml
* Edit /opt/oracle/product/10.1.0/db/appsutil/PROD_.xml directly.
- Replace all to
- Replace all to < newdomain.com>
4. Change hostname.
- Execute " system-config-network" to change the new hostname for the machine.
- Edit /etc/hosts with " newhost.newdomain.com ip newhost".
(After changing hostname, you'll not be able to startup any graphical application such as xclock due to "Xlib: connection to :0.0 refused by server". You can press "ctrl + alt + backspace" to kill x server.)
5. Execute AutoConfig for dbTier.
cd $ORACLE_HOME/appsutil/bin/
./adconfig.sh contextfile=$ORACLE_HOME/appsutil/PROD_.xml
FOR APPS TIER:
Note:341322.1 How to change the hostname of an Applications Tier using AutoConfig
1. Login as applmgr user.
2. De-register the current apps server.
perl $AD_TOP/bin/adgentns.pl appspass=apps contextfile=$CONTEXT_FILE -removeserver
3. Update AutoConfig Context file with new host information. It is easier to edit $CONTEXT_FILE directly.
* Copy $CONTEXT_FILE to a new context file.
cp /opt/oracle/apps/prodappl/admin/PROD_.xml
/opt/oracle/apps/prodappl/admin/PROD_.xml
* Edit /opt/oracle/apps/prodappl/admin/PROD_.xml directly.
- Replace all to
- Replace all < olddomain.com> to < newdomain.com>
4. Execute AutoConfig for appTier.
cd $AD_TOP/bin
./adconfig.sh contextfile=/opt/oracle/apps/prodappl/admin/PROD_.xml appspass=apps
FINISHING TASK:
AutoConfig doesn't convert E-Business Suite completely. Some settings may remain unchanged or reset to default. So, it is required to go check the configuration as described in Cloning Guide.
Identified steps are:
1. As applmgr, vi /opt/oracle/apps/prodappl/admin/adgetlnxver.sh to ensure ctxfile is pointing to correct PROD_.xml file.
ctxfile="/opt/oracle/apps/prodappl/admin/PROD_htb.xml"
2. As applmgr user, vi $IAS_ORACLE_HOME/Apache/Jserv/etc/jserv.properties to ensure:
wrapper.bin.parameters=-Djava.awt.headless=true
wrapper.bin.parameters=-DAdaptorCatalog=/opt/oracle/apps/prodappl/au/11.5.0/java/catalog.xml
wrapper.bin.parameters=-DClientMode=local
3. As oracle user, do the following:
$ sqlplus apps/apps
sql> update icx_parameters set session_cookie_domain=' newdomain.com';
sql> conn applsys/apps
sql> select profile_option_value from fnd_profile_option_values where profile_option_value like '%oldhost%';
sql> update fnd_profile_option_values set profile_option_value='/opt/oracle/db/proddb/9.2.0/appsutil/outbound/PROD_newhost' where profile_option_value like '%oldhost%';
3 rows will be updated.
sql> exit;
Done. You can startup AppTier now and access E-Business Suite login page at http://newhost.newdomain.com:8000.Labels: Change hostname for E-Business Suite |
| posted by Srinivasan .R @ 1:13 AM |
|
|
|
| Thursday, April 16, 2009 |
| Discoverer Troubleshooting |
Generic Discoverer Issues
Make sure Jserv is working fine.
For all other discoverer issues that comes while accessing viewer page or start_ie page or discolaunch.htm, try the following :
1. cd $ORACLE_HOME/discwb4/util
2. ./stopall.sh
3. ls –la .*id => there should not be any .*id file once the components are down. If any .*id file gets listed, do
a. more .oadid ( good for any .*id file present)
b. ps –eaf | grep nnnnn ( nnnnn is the value listed in step a )
c. If this is owned by the wrong user, remove the file.
4. Make sure ./startgatekeeper.sh is in startall.sh
5. ./startall.sh
6. Check locator.log, gatekeeper.log and oad.log for error messages
7. Check if the discoverer works fine. If not …
a. stopall.sh
b. startoad.sh
c. startosagent.sh
d. unregistercollector.sh
e. unregistersession.sh
f. unregisterpreference.sh
g. check for correct ip in pref.txt
h. applypreferences.sh
i. registerpreferences.sh
j. registersession.sh
k. registercollector.sh
l. stoposagent.sh
m. stopoad.sh
n. stopall.sh
o. startall.sh
Discoverer Viewer
Problem Description:
Discoverer Viewer fails with the following error...
Wide area network connection failed.
Unable to read locator.ior file at location file:/discwb4/applet/locator.ior. - Local area network connection failed. Failed to connect to locator .oracleoutsourcing.com_OracleDiscovererLocator4 using OSAgent. -
Gatekeeper connection failed. -
Hint: An administrator can further diagnose connection problems by running the "checkdiscoverer" script under /806/discwb4/util.
Resolution :
This happens when there is a discrepancy in the discoverer xml file.
1. To locate the filename and its location go to : $APACHE_TOP/Jserv/etc/disco4iviewer.properties
2. Look for "servlet.Viewer.initArgs" and note down the path it points to. Eg : "servlet.Viewer.initArgs=config=file:/tbmidi/product/iAS/Apache/Apache/htdocs/disco4iv/html/disco4iv.xml"
3. Now grep for "path" in the disco4iv.xml file. The path should ideally look like, for eg : path="/tbmidi/product/iAS/Apache/Apache/htdocs/discwb4/applet/"
If the full path is not mentioned, viewer fails.
In this case, the path would have looked like........path="/discwb4/applet/"
Change the path variable to display the full path as given in the eg.
4. Restart Apache Server.
Problem Description: Discoverer Viewer fails with the following error...
Internal Server Error
The server encountered an internal error or misconfiguration and was unable to complete your request. Please contact the server administrator, apdmrkmi@oracleoutsourcing.com and inform them of the time the error occurred, and anything you might have done that may have caused the error. More information about this error may be available in the server error log.
“mod_jserv.log” display the following error……..
[10/03/2005 17:08:39:120] (ERROR) ajp12: Servlet Error: Failed to set state
Resolution :
Update $APACHE_TOP/Jserv/etc/viewer.properties by moving the following lines above the line with "apps.zip" reference.
#-----------------------
wrapper.classpath=/dmrkmi/product/806/vbroker/lib/vbjorb.jar
wrapper.classpath=/dmrkmi/product/806/vbroker/lib/vbjapp.jar
wrapper.classpath=/dmrkmi/product/iAS/Apache/Apache/htdocs/disco4iv/disco4res.jar
#-----------------------
Problem Description: Discoverer Viewer fails with the following error...
Could not locate or parse the .dbc file corresponding to the given Oracle Applications instance.
Resolution :
Edit the $APPL_TOP/admin/_.xml context file and look for “s_appserverid_authentication”
Set this to OFF and rerun the adconfig
In 11510 default value is SECURE.
Discoverer Launcher
Problem Description: Discoverer Launcher fails with the following error...
Wide area network connection failed.
Unable to read locator.ior file at location http://:/discoshare/locator.ior - Local area network connection failed. Failed to connect to locator .oracleoutsourcing.com_OracleDiscovererLocator4 using OSAgent. -
Gatekeeper connection failed. -
Hint: An administrator can further diagnose connection problems by running the "checkdiscoverer" script under /806/discwb4/util.
Resolution :
This happens when the URL is wrong. It can be either the hostname or the port.
1.Ensure the “fnd_profile_option_values” has the correct URL set.
2.Grep for the URL in $APACHE_TOP/Apache/htdocs.
a.For eg, a big-up url is given a wrong port no. ie https://appsrolltest.oracleoutsourcing.com:10515
b.grep -ir appsrolltest * discwb4/scripts/htmlvars_apps.js:var ORAWEBDISCO_IORCODEBASE = https://appsrolltest.oracleoutsourcing.com:10515/discoshare/";
c.Change the URL to reflect the correct port.
Gatekeeper
Problem Description: Gatekeeper fails to start
Resolution:
1.Go to $APACHE_TOP/Apache/htdocs/discwb4/applet directory
2.Check the gatekeeper.log file for errors like ‘unable to bind to port’ or other errors.
3.Fix the error and restart gatekeeper.
Registering Components
Problem Description:
Registering Discoverer Preference Repository
oadutil reg: Unexpected SystemException org.omg.
CORBA.NO_IMPLEMENT[completed=MAYBE]
Resolution:
1.The issue is with TMPDIR in $ORACLE_HOME/discwb4/discwb.sh.
2.Make sure that the entry for TMPDIR exists in discwb.sh.
For eg; TMPDIR=/lhypei/applmgr/product/806/discwb4/tmp
Problem Description:
//applmgr/product/806/vbroker/bin/vbj[200]:
-Dorg.omg.CORBA.ORBClass=com.visigenic.vbroker.orb.ORB: unknown test
operator
Resolution:
Goto the line no. specified in brackets and put the correct syntax as follows :
if [ -d "${J_HOME}" ] && [ "${javavm}" = "java" ]; then
(Sometimes the line no. in the error will not match with the above line, in that case you need to search for the above line in the vbj file and correct it)
Problem Description:
//product/806/discwb4/bin/dis4pr: error while loading shared
libraries:
libclntsh.so.1.0: cannot open shared object file: No such file or directory Registering Discoverer Preference Repository.
Resolution:
1. ldd /tohagi/product/806/discwb4/bin/dis4pr
You will get libclntsh.so.1.0 => not found
2. Executed the above command in the source instance, to get the correct path of libclntsh.so.1.0.
3. Copy libclntsh.so.1.0 from source to target.
OAD
Problem Description: Failed to Start OAD. Possibly the OAD is already running in the same port.
Resolution:
1. Check for IP_ADDR in $ORACLE_HOME/discwb4/util/discwb.sh.
Correct the IP Address.
Note : Along with the above error, if oad.log shows : error while loading shared libraries: liborb.so: cannot open shared object file: No such file or directory.
2. Copy liborb.so from source MT where discoverer is running to target MT.
For eg : $ORACLE_HOME/vbroker/lib/liborb.so to target.
Problem Description: Failed to bind to OAD
The following errors can be found in locator.log :
VisiBroker: Unable to contact agent in local node or from list provided.
Will try to locate using broadcast.
oadutil reg: Unexpected SystemException org.omg.CORBA.NO_IMPLEMENT[completed=MAYBE]
Locator: No IP address given. Bind directly to server name
Unable to bind to or retrieve information from preference object auohscabo02.oracleoutsourcing.com_10715OracleDiscovererPreferences4
Could not locate the following object: repository id : IDL:DCICORBAInterface:1.0
(OR)
OAD: Fatal Error [Cross-device link].
Unable to create repository file: /tcaboi/applmgr/product/806/vbroker/adm/impl_dir/impl_rep. Make sure VBROKER_ADM environmentis set up correctly
Unable to create repository file: /tcaboi/applmgr/product/806/vbroker/adm/impl_dir/impl_rep
Resolution:
Create a directory by name “tmp” in $ORACLE_HOME/vbroker/adm and put the following entry in $ORACLE_HOME/discwb4/discwb.sh
TMPDIR=$ORACLE_HOME/vbroker/adm/tmp
export TMPDIRLabels: Discoverer Troubleshooting |
| posted by Srinivasan .R @ 5:10 AM |
|
|
|
|
| Error:ORA-01631 |
Overview Of ORA-01631: Max # Extents (%s) Reached in Table %s.%s
Text: max # extents (%s) reached in table %s.%s
---------------------------------------------------------------
Cause: A table tried to extend past maxextents
Action: If maxextents is less than the system maximum, raise it.Otherwise, you must recreate with larger initial, next or pctincrease params.
Explanation:
------------
The max extents error occurs when the current number of extents equals the maximum number of extents in the max_extents parameter for the object, or the maximum number of extents allowable for the db_block_size, whichever is smaller, and an attempt is made to add another extent. Max extents can be set for an object using the MAXEXTENTS option of the storage clause. These kind of problems could be avoided by pro-actively monitoring the object sizes that may reach their max_extents.
Diagnostic Steps:
-----------------
1. Run the following script to identify the tables with extent problems.
SQL> select segment_name, owner, extents, max_extents
2 from dba_segments
3 where segment_type = 'TABLE'
4 and (extents +1) >= max_extents;
2. Follow up the scripts in: Note 1019721.6 SCRIPT: SCRIPT TO REPORT TABLES APPROACHING MAXEXTENTS.
Possible solutions:
-------------------
1. If the value of max_extents for the affected object is less than the limit of maximum extents for the db_block_size of the database (refer to Note 1015356.4), then more extents could be allocated to the object.
Alter the STORAGE clause of the object to increase MAXEXTENTS.
In databases version 7.3.X or higher one could specify maxextents
UNLIMITED (i.e. 2147483645), but use this with caution.
ALTER TABLE .table STORAGE ( MAXEXTENTS x);
where x is greater than max_extents and lesser than unlimited (2147483645);
ALTER TABLE .table STORAGE ( MAXEXTENTS UNLIMITED);
Remark: Note 50380.1 ALERT: Using UNLIMITED Extent Format
2. It is not advisable to have a lot (hundreds of thousands, etc.) of extents that could result in large amounts of of space management operations in dictionary managed tablespase. In that case, or when the number of max_extents for the affected object reached the limit of maximum extents for the db_block_size,recreate the object with more efficient storage.Export the table and precreate the table before import, using larger storage parameters (initial, next, pctincrease) - to result in fewer extents, or export using COMPRESS=Y - to minimize number of extents after import.Labels: Error:ORA-01631 |
| posted by Srinivasan .R @ 4:54 AM |
|
|
|
| Monday, April 13, 2009 |
| Multi-Node Installation |
Multi-node Installation
With the multi-node installation option, the configuration possibilities are endless. Any server can be placed on any node. You can also use this option to install multiple forms servers to balance the load of forms usage.
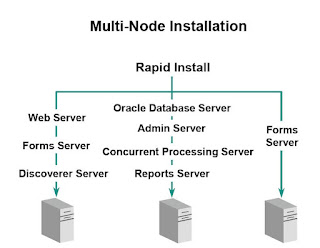
Benefits of a Multi-node Installation
The multi-node installation provides many benefits, including those listed on this slide. If you decide to have your forms servers in a Linux environment and your database servers in a UNIX environment, Rapid Install helps you to configure this multi-platform environment.
Note: If you install multiple forms servers, they must be configured identically (including the operating system), otherwise load balancing will not function properly.
Setting Up a Multi-node Installation
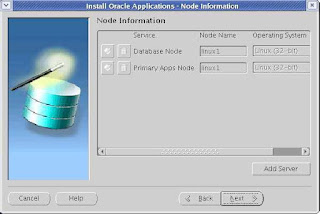
In a multi-node installation, you can set up your servers on more than one node. That means you can install any type of server, on any number of nodes, in any combination. Regardless of the number of nodes you plan to use, a multi-node installation requires that you run Rapid
Install on your database node first, before you install the other nodes. Then, using the same configuration file you created while setting up your database node, you run Rapid Install on each of the other nodes in your installation.
Setting Up a Multi-node Installation
Running the Rapid Install Wizard
Step 1: Choose an installation operation
Step 2: Choose a configuration type
Step 3: Choose environment
Step 4: Register Applications products and components
Step 5: Select country-specific functionality
Step 6: Select NLS settings
Step 7: Select host names
Step 8: Specify main settings information
Step 9: Specify derived settings information
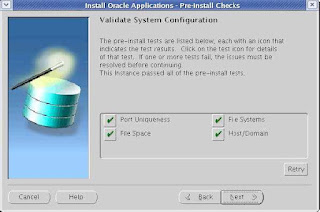
Step 10: Review instance settings information
Step 11: Save the configuration file
Step 12: Review pre-install test results
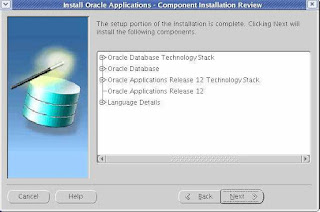
Step 13: Begin the installation
Step 14: Complete the installation on the other nodes
Step 1: Choose an installation operation
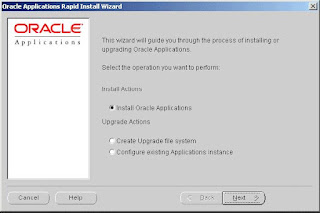
Choose an installation operation
Click the Install Oracle Applications button. Pressing the Tab key moves the cursor between options. Moving the cursor by pressing the Up or Down Arrow keys selects the option as well.
Click Next to continue.
Step 2: Choose a configuration type
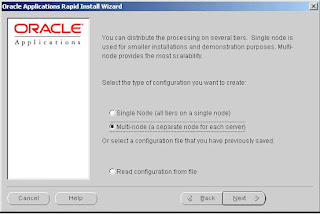
Select Multi-node to set up a configuration that installs the servers on two or more nodes. Besure that the first server you install and set up is the database. After you complete that installation, you will run Rapid Install on each of the other nodes in your system. Click Next to
continue.
Step 3: Choose environment
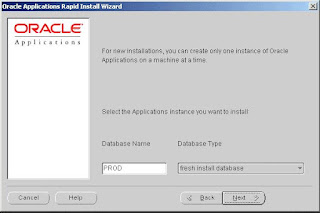
Choose environment: Database name
In order to identify the Oracle Applications environment, give it a name and indicate the type of database you want to install.
Rapid Install uses default names that suggest possible uses for the environment:
• A production environment is a fully configured Release 11i installation that can be used for live production purposes.
• A test environment is a mirror image of a production Release 11i installation. You can use it to test your installation before you go live.
• A Vision Demo environment can be used to set up a Release 11i installation for
demonstration purposes.
Note: If you want to install another instance, for example, to use as a test environment, run the Rapid Install wizard again and identify the new environment on this screen.
After you type the name, choose the type of database that you want to install. The database
options are:
• Fresh install database: An empty Oracle database, typically used for production or
testing.
• Vision Demo database: An Oracle Vision Demonstration database used to set up demos
or for evaluation purposes.
• Do not install a database: This option assumes an existing database. It creates an
Applications instance and configures it using your existing database. It is typically used for Windows clusters.
Click Next to continue.
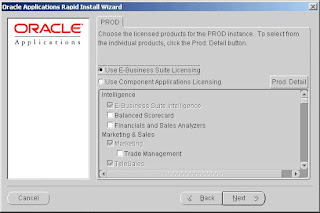
Step 4: Register Applications products and components
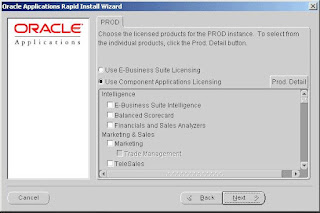
Rapid Install installs all products regardless of their licensed status. You use this screen to register the products that you have licensed for use in your system. Your Oracle Corporation license agreement specifies the type of license that applies to your installation. Click Use
Component Applications Licensing or Use E-Business Suite Licensing, according to the
agreement. Rapid Install automatically installs and registers shared and dependent products for you, so they are selected by default.
Choosing the Component Applications Licensing option registers the products for the
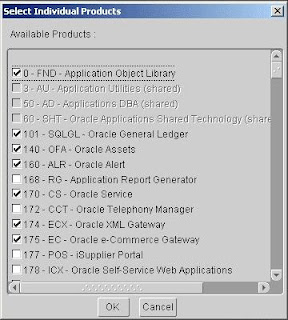
Applications component(s) specified in your license agreement. When you choose to register an Applications component, you register all the products that it includes. You can also register the products in a component individually. To view individual products, click the Prod. Detail
button. The Available Products screen appears.
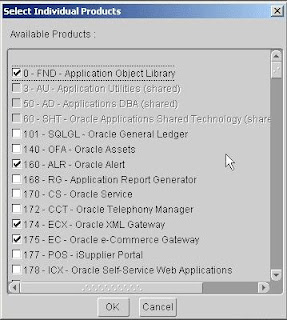
All individual Oracle products are listed on this screen, including shared or dependent products. Notice that Rapid Install places a check mark beside the products you indicated on the register products screen. Shared or dependent products are shaded, so you cannot select them. Rapid Install automatically installs and registers these shared and dependent products for
you, so they are selected by default.
Review your selections on this screen. If you selected a component on the previous screen, you cannot deselect any of its individual products on this screen. If you want to install individual products instead of all the products in a component, press Cancel to return to the product registration screen. Uncheck Use Component Applications Licensing, and do not check any component applications. Click Prod. Detail and make individual product selections on the
Available Products screen. Click OK to return to the product registration screen.
Choosing the E-Business Suite Licensing option causes Rapid Install to automatically register all the products included in the E-Business Suite price bundle.
Note that some of the modules are grayed out. The ones that are not must be installed
separately as Add-on products — they are not part of the E-Business Suite price bundle. Click the Prod. Detail button to display the Available Products screen.
Most of the individual Add-on products are checked, indicating that they will be installed and registered automatically. If you want to select individual products, select them now.
If you have chosen to install a product that is controlled, Rapid Install displays an alert screen.
Follow the instructions on the screen as they apply to your installation. Click OK to return to the product registration screen. Click Next to continue.
Note: Once a product is registered, it cannot be unregistered.
Step 5: Select country-specific functionality
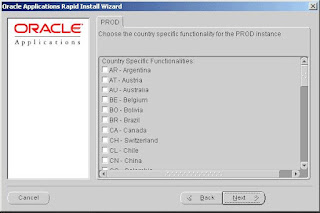
Select country-specific functionality
If you will use country-specific features, select one or more country-specific functionalities to install. All countries that Oracle supports are listed on this screen. Click the appropriate check box to make your selections. Click Next to continue.
Note: The Globalizations products, JA, JE, JG, and JL are associated with country-specific functionalities. They cannot be registered from the product registering screens. For example, when you select BR-Brazil, the JL product will be set to licensed.
Step 6: Select NLS settings
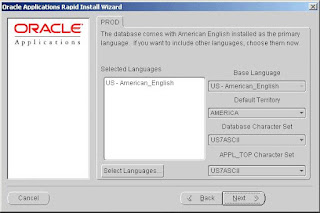
The fresh install database comes with American English installed as the default base language, AMERICA as the default territory, and US7ASCII as the default character set. You can select additional languages and modify the default base language and the default territory settings on this screen.
If you select additional languages, you may also need to select an alternative character set for the database and the APPL_TOP. Note that the conversion to a different character set will be automatic, but it may take several hours to complete.
The default territory is used as the NLS territory setting for all users of the Applications installation. The base language is used as the default NLS language setting. Choose a territory from the list of NLS territories if you want to change the default territory setting. Click Select Languages to see a list of available languages.
Note: Release 11i does not support changing NLS settings or the character set for the Vision Demonstration database.
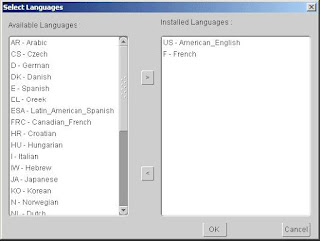
In prior versions of Release 11i, the Rapid Install wizard only registered additional languages — it did not actually install them. In this release, the language files will be installed in the APPL_TOP file system during the installation. If you choose to add a language(s) on this screen, Rapid Install prompts you for the location of the language CD(s) later in the
installation. You must have the Oracle Applications Release 11i NLS CD pack available at that time.
Warning: If you do not have the language CDs available when Rapid Install prompts you for their location, the installation will stop and you will not be able to continue.
Double-click a language to move it into the Installed Languages list or highlight it and click the right arrow key. Highlighting a language in the Installed Languages box and clicking the left arrow removes it. You cannot remove American English from this list. Click OK to continue.
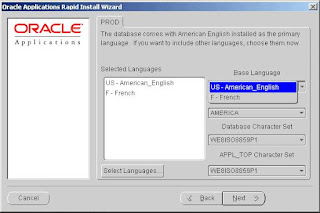
The Base Language list box now shows multiple language choices and the Database Character Set and APPL_TOP Character Set list boxes have changed to a character set that is common to all the selected languages.
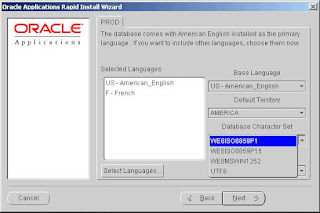
If you want to change the database and APPL_TOP character set from the values shown, select a new value from the dropdown box. If you need to use a character set that is not shown in the dropdown box, enter the APPL_TOP character set name directly in the derived settings screen
(see Step 9), or the database character set name on the instance settings screen (see Step 10).
Click Next to continue.
Note: The languages you install must be compatible with the character set you choose.
After Rapid Install processing is complete, you must perform additional tasks to complete the
language installation. See the Oracle Applications NLS Release Notes for more information.
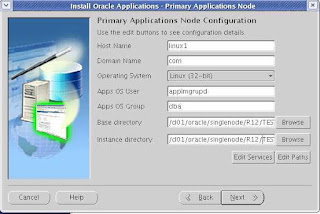
Step 7: Select host names
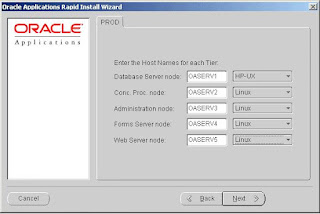
In a multi-node installation, the Rapid Install wizard asks for the names of the hosts where you will install the components for your installation. You can choose to install servers on any number of nodes, each running a different operating system. In the example, Rapid Install will set up the database server on a host named OASERV1 on a machine running on HP-UX. The remaining servers (concurrent processing server, admin server, forms server, and web server)
will be set up on separate hosts (OASERV2, OASERV3, and so on), each running on Linux.
Click Next to continue.
Step 8: Specify main settings information
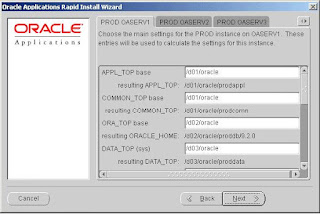
Specify the main settings for the various top-level directories and user accounts for your installation.
The labels on the tabs are derived from the host names you specified on the previous screen. The parameters listed under each tab are determined by the platform you specified for the associated host. For example, if you set up an admin server node called OASERV3 that will run on Linux, the list includes Linux-specific settings such as APPS OS User and APPS OS
Group. If you indicated that the admin server node runs on Windows, the settings include NT Password and NT User, but not APPS OS User or APPS OS Group.
There is a separate tab for each node. Click on the tab to activate the settings list. Use the vertical scroll bar or the Up and Down Arrow keys to scroll through the main settings fields and default values. Change the values or accept the current settings.
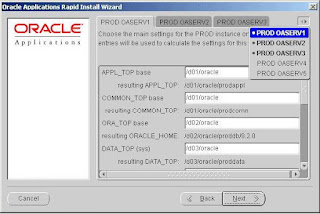
If there are more than three hosts to be set up, click the arrow button in the top right corner to access the tabs that are not shown on the screen.
If you are configuring a number of application (middle) tiers to share a single APPL_TOP, the APPL_TOP base and COMMON_TOP base should be the same for all application tiers and should be set to the shared disk resource.
Main Settings
APPL_TOP base: This default directory mount setting appears on subsequent Rapid Install screens for convenience. This is the base directory for the APPL_TOP.
COMMON_TOP base: This is the base directory for the COMMON_TOP. It contains other
directories for files that are used across products or in conjunction with third-party products. This default directory mount setting appears on subsequent Rapid Install screens for convenience.
ORA_TOP base: The base directory for the RDBMS installation.
DATA_TOP (sys): The directory on the database node that contains the data dictionary for the entire RDBMS.
DATA_TOP (logs): The directory on the database node that contains the redo log files used by the RDBMS.
DATA_TOP (data): The directory on the database node that contains the data tablespaces.
Each product has its own data tablespace within this directory.
Apps OS User (UNIX): Owner of the Oracle Applications file system and Applications
technology stack.
Apps OS Group (UNIX): Default OS (operating system) group for the Applications OS user.
Oracle OS User (UNIX): Owner of the Oracle database file system.
Oracle OS Group (UNIX): Default OS (operating system) group for the Oracle OS user.
NT User (Windows): If you choose the Windows platform for running the concurrent
manager service, this is the user that runs the service.
NT Password (Windows): If you choose the Windows platform for running the concurrent
manager service, this is the password of the user that runs the service.
DNS Domain Name: A valid domain name used when configuring Oracle Applications for the network. This is a required field. You must enter a domain name that, when combined with a host name, produces a fully qualified domain name.
X DISPLAY (UNIX): Used by the reports server, forms server, Apache server, and the
concurrent manager, this display must always be accessible during runtime. Should be set to an active X Windows display, and should point to a machine that is always available to the Oracle Applications instance.
Step 9: Specify derived settings information
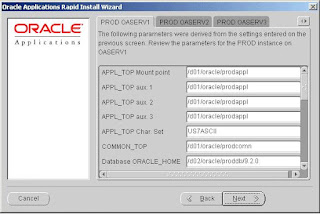
The following screen shows detailed settings for each host you set up on the main setting screen in the previous step. Click on a tab to activate the settings list. Use the vertical scroll bar or the Up and Down Arrow keys to scroll through the main settings fields and default values.
Click Next to continue.
Note: If you change a recommended character set (by overwriting the default) in this screen, be sure the languages you install are compatible with the character set you choose.
Derived Settings
APPL_TOP Mount Point, APPL_TOP aux 1, APPL_TOP aux 2, APPL_TOP aux 3: The
primary APPL_TOP mount point directory, and the auxiliary mount point directories used to distribute APPL_TOP among multiple directories or partitions. If you plan to install the entire file system on one mount point or disk, all APPL_TOP auxiliary directories should have the same mount point or disk name.
APPL_TOP Char. Set: The character set of the files within the file systems installed on the application tier. The character set is carried over from your selection in the NLS Settings of the Language screen.
COMMON_TOP: The common top directory holds directories for files that are used across
products or in conjunction with third-party products. It contains the:
• Rapid Install admin directory with subdirectories for concurrent manager log and out
directories, the install subdirectory (contains scripts used only during an install), and the
scripts subdirectory (contains scripts used for daily maintenance of the Oracle
Applications instance).
• html directory, which contains files used by html-based products such as JSP files, Java scripts, xml files, and style sheets.
• java directory where Rapid Install installs all Oracle Applications JAR files. It also holds 3rd-party Java files.
• portal directory, which contains Rapid Install Portal files.
• temp directory, which is used for caching by some processes such as Oracle Reports.
• util directory, which contains 3rd-party utilities such as JDK, JRE, and UnZip.
Database ORACLE_HOME: The ORACLE_HOME directory installed on the database tier.
It hosts the Oracle database server.
8.0.6 ORACLE_HOME: The ORACLE_HOME directory installed on each node of the
application tier. This ORACLE_HOME hosts the Oracle Developer components of the
Applications technology stack. The application tier file system is linked to this 8.0.6 ORACLE_ HOME.
Tool ORACLE_HOME: The ORACLE_HOME directory installed on each node of the
application tier that is used for the iAS components, including the Oracle HTTP server.
DATA_TOP (sys): The directory on the database node that contains the data dictionary for the entire RDBMS.
DATA_TOP (logs): The directory on the database node that contains the redo log files used by the RDBMS.
DATA_TOP (data): The directory on the database node that contains the data tablespaces. Each product has its own data tablespace within this directory.
DATA_TOP (index): The directory on the database node that contains the index tablespaces. Each product has its own index tablespace within this directory.
JAVA_TOP: Contains the Java files used by all Oracle Applications products. This directory is in the COMMON_TOP directory.
PORTAL_TOP: Contains the HTML used to review and complete the installation after Rapid Install. These include the post-install steps and the configuration files, written as HTML files.
JRE_TOP: Contains the Java Runtime Engine files used by all Oracle Applications products.These include the Java platform core classes and supporting files.
Temp Directory: Contains temporary files. This directory is not used during installation.
Apps OS User (UNIX): Owner of the Oracle Applications file system and Applications
technology stack.
Apps OS Group (UNIX): Default OS (operating system) group for the Applications OS user.
Oracle OS User (UNIX): Owner of the database file system.
Oracle OS Group (UNIX): Default OS (operating system) group for the Oracle OS user.
NT User (Windows): If you choose the Windows platform for running the concurrent
manager service, this is the user that runs the service.
NT Password (Windows): If you choose the Windows platform for running the concurrent
manager service, this is the password of the user that runs the service.
DNS Domain Name: The domain the machine is assigned to on the network.
MKS Directory (Windows): MKS tools must be added in the PATH so that executables can
be used to relink Applications executables and .DLLs.
MSDEV Directory (Windows): Location of the Visual C/C++ executables and .DLL files.
Used for linking Applications executables or .DLLs.
DBA Group Name (UNIX): The user that owns the Oracle database must belong to this
group.
X DISPLAY (UNIX): Used by the reports server, forms server, apache server, and the
concurrent manager, this display must always be accessible during runtime. Should be set to an active X Windows display, and should point to a machine that is always available to the Oracle Applications instance.
External JDK: Points to location of the JDK installation. Required by Apache to successfully start the JSERV engine. Must be the same as the location where you downloaded JDK.
OUI Inventory Path (Windows): Path used by the Oracle Universal Installer (OUI) for
installation. The Inventory contains components installed by Rapid Install and is used for patching in certain circumstances.
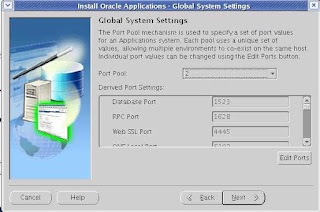
Step 10: Review instance settings information

Rapid Install uses the values specified on this screen to configure server processes, such as those on the forms and web servers, as well as listener processes.
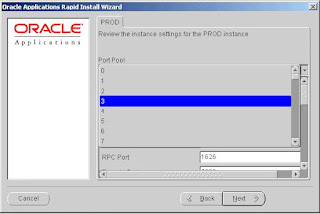
The starting number of the port value is pre-set, but you can set the incremental number by using the dropdown list in the Port Pool field. The Port Pool list provides a way to use a predefined set of server ports. There are 100 port pool selections.
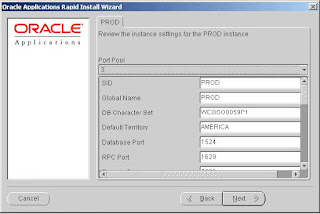
For example, if you select 3, the default Database Port number (1521) becomes 1524
(increment of 3). If you do not want to use the port pool feature, you can specify ports manually by adjusting individual server port values where appropriate.
Use the vertical scroll bar or the Up and Down Arrow keys to move through the instance settings. You can change the values or accept the current settings. Click Next to continue.
Instance Settings
SID: Name of the database instance.
Global Name: Global database name.
DB Character Set: Character set of the database.
Default Territory: Defines the NLS territory.
Database Port: Net Services Listener port that receives requests from the various servers for processing on the RDBMS.
RPC Port: Oracle Applications uses the Report Review Agent (an RPC server process). The RPC port is the TCP/IP port on the concurrent processing server node that receives incoming Report Review Agent requests.
Reports Port: TCP/IP port on the reports server that receives incoming requests from
browsers or other servers.
Web Listener Port: HTTP port on the web server that receives incoming requests from
browsers or other servers.
OProcMgr Port: Port for process that monitors the Apache JVM state. Routes requests for the JVM.
Instance Settings
Web PLSQL Port:. Port that receives PL/SQL data and HTML content from the database and re-directs it to the PL/SQL Apache listener.
Servlet Port: Port on the web server that browsers connect to when invoking Java servlets.
Forms Listener Port: TCP/IP port on the forms server that receives incoming requests from browsers or other servers.
Metrics Server Data Port: TCP/IP port on which the Metrics server receives load data from
Metrics clients running on other machines.
Metrics Server Req. Port: TCP/IP port on which the Metrics server receives the “least-loaded
host” requests from forms clients.
JTF Fulfillment Server Port: TCP/IP port on which the Fulfillment server receives requests from a remote process.
Map Viewer Servlet Port: Dedicated TCP/IP servlet port on the web server that receives requests for the Map Viewer.
OEM Web Utility Port: Dedicated TCP/IP port on the web server that receives requests for the Oracle Enterprise Manager.
VisiBroker OrbServer Agent Port: Dedicated TCP/IP port on the web server that receives requests for the VisiBroker OrbServer agent, used by Oracle Discoverer.
MSCA Server Port: Port used by the MSCA (Mobile Supply Chain Applications) server.
MSCA Dispatcher Port: Port used by the MSCA Dispatcher.
OACORE Servlet Port Range: Range of ports used by the OACORE servlets (for the Self-
Service framework).
Discoverer Servlet Port Range: Range of ports used by the Discoverer servlets.
Forms Servlet Port Range: Range of ports used for the Forms Servlet JServ processes.
XMLSVCS Servlet Port Range: Range of ports used by the XML service.
Step 11: Save the configuration file
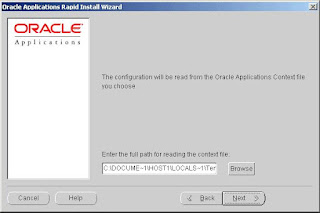
You have now completed all the information Rapid Install needs to install your Oracle
Applications products. The next screen asks you to save your installation settings in a configuration file. This file (config.txt) stores the configuration parameters that you entered on the settings screens.
The default is to store the configuration file in the system temporary directory. It’s a good idea to choose a permanent directory location because you will use this file to complete the installation on the other nodes. Enter a directory path or click Browse. Select a location and click Next to continue.
Step 12: Review pre-install test results
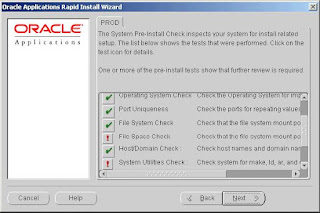
Rapid Install begins to perform a series of system checks to validate the configuration described by your configuration file. As the parameters are tested, the results of the validation
checks are recorded in the system test dialog box. When the tests are complete, Rapid Install provides a check list of the tests that it performed and an indication of whether the tests succeeded or failed.
Parameter Validation
The parameters that Rapid Install validates include:
• Port Availability validates the ports you selected are available for use.
• Operating System Check validates the patches and/or version levels of your operating system.
• Port Uniqueness validates that there are no duplicate defined ports for server processes.
• File System Check validates that file system mount points exist and have correct privileges.
• File Space Check validates that file system mount points have sufficient space.
• Host/Domain Check validates that host and domain names are verified by the DNS
server.
• System Utilities Check validates that linking utilities (make, ld, and cc) are available.
• JDK Availability Check validates that JDK exists in the location you supplied.
The results of each test are displayed using check list icons. Scroll down the list to see the
results. There are three result types:
• Check mark: The test succeeded.
• Exclamation mark (!): The configuration requires review. Click the ! to get information about the system test review. Click Yes to continue, and No if you are going to resolve the issues. Rapid Install alerts you if you continue without resolving the issues.
• An x mark: All issues marked x must be resolved before you continue with the
installation. Click the x to see the errors. If you can resolve an issue by fixing the values provided on the settings screen(s), click Back until you reach the appropriate screen, and re-enter the values. Some tests must be resolved in the operating system. In that case, you may have to restart the Rapid Install wizard after the problem has been fixed. When there are no issues to resolve, click Next to continue.
Step 13: Begin the installation (on the database node)

Rapid Install lists the actions it will take during the installation process. The list varies based on your installation. Click Next to continue.
Rapid Install displays another alert screen asking you to verify that you are ready to begin the installation. Click Yes to continue. Rapid Install begins the installation. When the installation is complete, you have installed Oracle Applications on the database node.
Step 14: Complete the installation on the
other nodes
Completion of the database node installation is the first step in a multi-node installation. Next, you must set up the additional nodes. You can set up additional nodes in any order.
1. Copy the configuration file (config.txt) you saved in Step 11 to each of the other nodes in your installation.
2. Start Rapid Install, and choose the Install Oracle Applications option. Click Next to continue.
3. On the next screen (configuration type), choose the Read Configuration from File option.
Click Next to continue.
4. Rapid Install prompts you for the location of the config.txt file on this node.Enter the directory path, or click Browse. Then click Next to continue.
5. Because you set up the parameters for all nodes when you first created the configuration file, Rapid Install automatically moves past the main settings, derived settings, and instance settings screens. It goes directly to the pre-install test and begins the validation process. See Step 12 for details.
6. Review or resolve any issues flagged with ! or x on the pre-install test results screen.
Then, click Back to return to the screen where you saved the configuration file. Click Next to re-run the pre-install test. If there are no issues listed on the summary screen, click Next to continue.
7. Click Next when each alert screen is displayed. Rapid Install begins the installation on the second node.
8. Repeat all the steps in this section for each of the other nodes in your installation.Labels: Multi-Node Installation |
| posted by Srinivasan .R @ 3:06 AM |
|
|
|
|
|


