|
| Wednesday, April 8, 2009 |
| Single-node Installation |
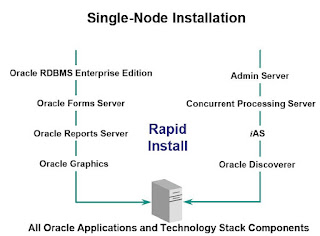
Single-node Installation
For a single-node installation, everything is installed on one node. All Oracle Applications components, Applications technology stack components, and the database are installed on a single machine. It’s a rather seamless installation in that all components are pre-certified.
This environment is suitable for situations where a large volume of transactions is notexpected, such as a development or training environment. A large production environment with heavy transaction volume is more likely to require a multi-node installation.
Setting Up a Single-node Installation
Running the Rapid Install Wizard
Step 1: Choose an installation operation
Step 2: Choose a configuration type
Step 3: Choose environment
Step 4: Register Applications products and
components
Step 5: Select country-specific functionality
Step 6: Select NLS settings
Step 7: Specify main settings information
Step 8: Specify derived settings information
Step 9: Review instance settings information
Step 10: Save the configuration file
Step 11: Review pre-install test results
Step 12: Begin the installation
Step 1: Choose an installation operation
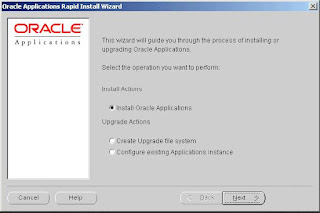
Choose an installation operation
Upon starting Rapid Install with the rapidwiz command, the first screen appears.
Click the Install Oracle Applications button. Pressing the Tab key moves the cursor between options. Moving the cursor by pressing the Up or Down Arrow keys selects the option as well.
Click Next to continue.
Note: The Upgrade Actions are used when upgrading a 10.7 or 11.0 Oracle Applications
system to Release 11i.

Step 2: Choose a configuration type
Choose a configuration type
Choose the Single Node option to set up a system with the database, admin, concurrent
processing, forms, and web servers on a single node. Click Next to continue
Step 3: Choose environment
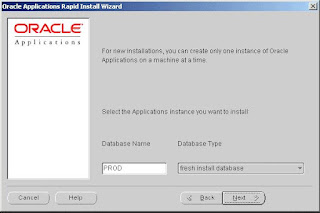
Choose environment: Database name
In order to identify the Oracle Applications system, give it a name and indicate the type of database you want to install.
Rapid Install uses default names that suggest possible uses for the environment:
• A production environment is a fully configured Release 11i installation that could be
used for live production purposes.
• A test environment is a mirror image of a production Release 11i installation. You should
use it to test your installation before you go live.
• A Vision Demo environment can be used to set up a Release 11i installation for
demonstration purposes.
Note: If you want to install another instance, for example, to use as a test environment, run the
Rapid Install wizard again and identify the new environment on this screen.
Step 3: Choose environment
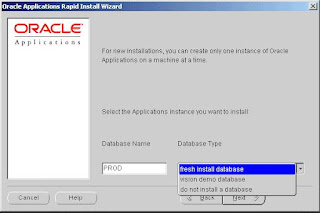
Choose environment: Database type
After you type the name, choose the type of database that you want to install. The database
options are:
• Fresh install database: An empty Oracle database, typically used for production or
testing.
• Vision Demo database: An Oracle Vision Demonstration database used to set up demos
or for evaluation purposes.
• Do not install a database: This option assumes an existing database. It creates an
Applications instance and configures it using your existing database. It is typically used
for Windows clusters.
Click Next to continue.
Step 4: Register Applications products and components
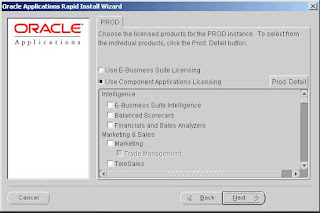
Register Applications products and components: Component Applications
licensing Rapid Install installs all products regardless of their licensed status. You use this screen to register the products that you have licensed for use in your system. Your Oracle Corporation license agreement specifies the type of license that applies to your installation. Click Use
Component Applications Licensing or Use E-Business Suite Licensing, according to the
agreement. Rapid Install automatically installs and registers shared and dependent products for
you, so they are selected by default.
Choosing the Component Applications Licensing option registers the products for the
Applications component(s) specified in your license agreement. When you choose to register
an Applications component, you register all the products that it includes. You can also register the products in a component individually. To view individual products, click the Prod. Detail button. The Available Products screen appears.
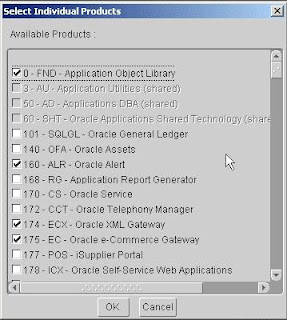
Step 4: Register Applications products and components
Register Applications products and components: Component Applications
licensing
All individual Oracle Applications products are listed on this screen, including shared or dependent products. Notice that Rapid Install places a check mark beside the products you indicated on the register products screen. Shared or dependent products are shaded, so you cannot select them. Rapid Install automatically installs and registers these shared and dependent products for you, so they are selected by default.
Review your selections on this screen. If you selected a component on the previous screen, you cannot deselect any of its individual products on this screen. If you want to install individual products instead of all the products in a component, press Cancel to return to the product registration screen. Uncheck all component applications, then click Prod. Detail and make individual product selections on the Available Products screen. Click OK to return to the product registration screen.
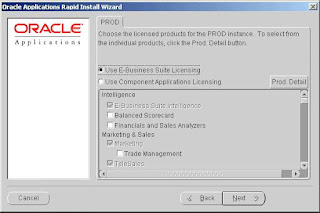
Register Applications products and components: E-Business Suite Licensing
Choosing the E-Business Suite Licensing option causes Rapid Install to automatically register all the products included in the E-Business Suite price bundle.
Note that some of the modules are grayed out. The ones that are not must be installed
separately as Add-on products — they are not part of the E-Business Suite price bundle. Click the Prod. Detail button to display the Available Products screen.
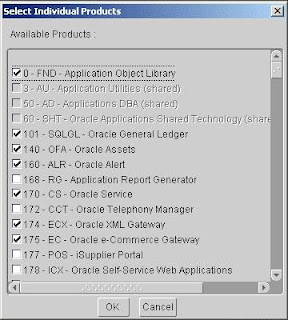
Register Applications products and components: E-Business Suite Licensing
Most of the individual Add-on products are checked, indicating that they will be installed and registered automatically. If you want to select additional individual products, select them at this time.
If you have chosen to install a product that is controlled, Rapid Install displays an alert screen.
Follow the instructions on the screen as they apply to your installation. Click OK to return to the product registration screen. Click Next to continue.
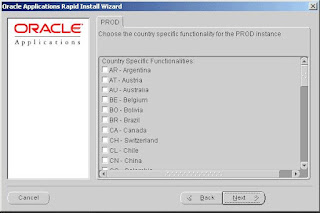
Step 5: Select country-specific functionality
Select country-specific functionality
If you will use country-specific features, register them on this screen. All countries that Oracle supports are listed on this screen. Click the appropriate check box to make your selections.
Click Next to continue.
Note: The Globalizations products, JA, JE, JG, and JL are associated with country-specific functionalities. They cannot be registered from the product registering screens. For example, when you select BR-Brazil, the JL product will be set to licensed.
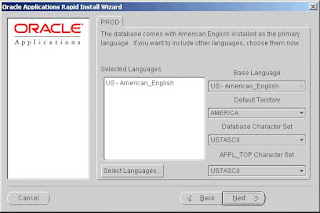
Step 6: Select NLS settings
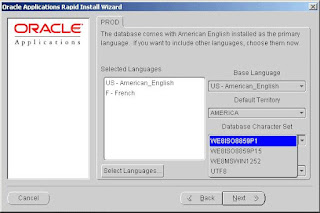
Select NLS settings
The fresh install database comes with American English installed as the default base language, AMERICA as the default territory, and US7ASCII as the default character set. You can select additional languages and modify the default base language and the default territory settings on this screen.
If you select additional languages, you may also need to select an alternative character set for the database and the APPL_TOP. Note that the conversion to a different character set will be automatic, but it may take several hours to complete.
The default territory is used as the NLS territory setting for all users of the Applications installation. The base language is used as the default NLS language setting. Choose a territory from the list of NLS territories if you want to change the default territory setting. Click Select Languages to see a list of available languages.
Note: Release 11i does not support changing NLS settings or the character set for the Vision Demonstration database.
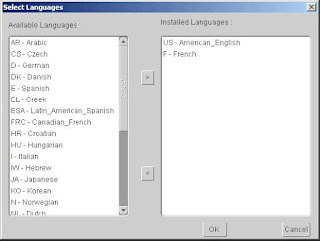
Step 6: Select NLS settings
Select NLS settings: Languages
In prior versions of Release 11i, the Rapid Install wizard only registered additional languages — it did not actually install them. In this release, the language files will be installed in the APPL_TOP file system during the installation. If you choose to add a language(s) on this screen, Rapid Install prompts you for the location of the language CD(s) later in the
installation. You must have the Oracle Applications Release 11i NLS CD pack available at that time.
Warning: If you do not have the language CDs available when Rapid Install prompts you for their location, the installation will stop and you will not be able to continue.
Double-click a language to move it into the Installed Languages list or highlight it and click the right arrow key. Highlighting a language in the Installed Languages box and clicking the left arrow removes it. You cannot remove American English from this list. Click OK to continue.
Step 6: Select NLS settings: Base Language
The Base Language list box now shows multiple language choices and the Database Character Set and APPL_TOP Character Set list boxes have changed to a character set that is common to all the selected languages.
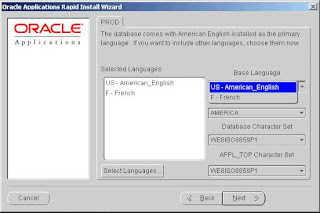
Step 6: Select NLS settings: Character Set
If you want to change the database and APPL_TOP character set from the values shown, select a new value from the dropdown box. If you need to use a character set that is not shown in the dropdown box, enter the APPL_TOP character set name directly in the derived settings screen
(see Step 8), or the database character set name on the instance settings screen (see Step 9).
Click Next to continue.
Note: The languages you install must be compatible with the character set you choose.
After Rapid Install processing is complete, you must perform additional tasks to complete the language installation. See the Oracle Applications NLS Release Notes for more information.
Step 7: Specify main settings information
Specify the main settings for the various top-level directories and user accounts for your installation. The values you define here are used to calculate the settings for the system and are carried over to subsequent screens where you define the detailed directory and instance settings.
The tab label is derived from the name of the machine you are using to run the Rapid Install wizard. The default directories are created using the appropriate operating system syntax for that machine. Windows syntax is shown in the example.
Use the vertical scroll bar or the Up and Down Arrow keys to move the main settings fields and default values into view. Click Next to continue.
Main Settings
APPL_TOP base: This default directory mount setting appears on subsequent Rapid Install screens for convenience. This is the base directory for the APPL_TOP.
COMMON_TOP base: This is the base directory for the COMMON_TOP. It contains other
directories for files that are used across products or in conjunction with third-party products. This default directory mount setting appears on subsequent Rapid Install screens for convenience.
ORA_TOP base: The base directory for the RDBMS installation.
DATA_TOP (sys): The directory on the database node that contains the data dictionary for the entire RDBMS.
DATA_TOP (logs): The directory on the database node that contains the redo log files used by the RDBMS.
DATA_TOP (data): The directory on the database node that contains the data tablespaces.
Each product has its own data tablespace within this directory.
Main Settings
Apps OS User (UNIX): Owner of the Oracle Applications file system and technology stack.
Apps OS Group (UNIX): Default OS (operating system) group for the Applications OS user.
Oracle OS User (UNIX): Owner of the Oracle database file system.
Oracle OS Group (UNIX): Default OS (operating system) group for the Oracle OS user.
NT User (Windows): If you choose the Windows platform for running the concurrent
manager service, this is the user that runs the service.
NT Password (Windows): If you choose the Windows platform for running the concurrent
manager service, this is the password of the user that runs the service.
DNS Domain Name: A valid domain name used when configuring Oracle Applications for
the network. This is a required field. You must enter a domain name that, when combined with a host name, produces a fully qualified domain name. For example, in the fully qualified domain name myhost.in.appsdbaportal.com, the domain name is in.appsdbaportal.com.
X DISPLAY (UNIX): Used by the reports server, forms server, Apache server, and the
concurrent manager, this display must always be accessible during runtime. Should be set to an active X Windows display, and point to a machine that is always available to the Oracle Applications instance.

Step 8: Specify derived settings
information
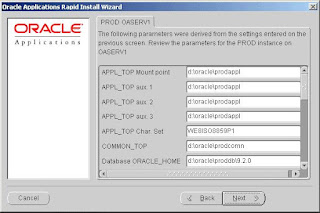
Step 8: Specify derived settings information
This screen shows detailed settings for the environment. The values are derived from those entered on the main settings screen in the previous step. Use the vertical scroll bar or the Up and Down Arrow keys to move the derived settings fields and default values into view. Click
Next to continue.
Note: If you change a recommended character set (by overwriting the default) in this screen,
be sure the languages you install are compatible with the character set you choose.
Derived Settings
Derived Settings
APPL_TOP Mount Point, APPL_TOP aux 1, APPL_TOP aux 2, APPL_TOP aux 3: The
primary APPL_TOP mount point directory and the auxiliary mount point directories used to distribute APPL_TOP among multiple directories or partitions.
If you plan to install the entire file system on one mount point or disk, all APPL_TOP auxiliary directories should have the same mount point or disk name. In this case, your APPL_TOP disk space requirements will be 12 - 14 GB, depending on your platform.
APPL_TOP Char. Set: The character set of the files within the file systems installed on the application tier. The character set is carried over from your selection in the NLS Settings of the Language screen.
COMMON_TOP: The common top directory holds directories for files that are used across
products or in conjunction with third-party products. It contains the:
• Rapid Install admin directory with subdirectories for concurrent manager log and out directories, the install subdirectory (contains scripts used only during an install), and the scripts subdirectory (contains scripts used for daily maintenance of the Oracle Applications instance).
• html directory, which contains files used by html-based products such as JSP files, Java scripts, xml files, and style sheets.
• java directory where Rapid Install installs all Oracle Applications JAR files. It also holds 3rd-party Java files.
• portal directory, which contains Rapid Install Portal files.
• temp directory, which is used for caching by some processes such as Oracle Reports.
• util directory, which contains 3rd-party utilities such as JDK, JRE, and UnZip.
Database ORACLE_HOME: The ORACLE_HOME directory installed on the database tier.It hosts the Oracle database server.
8.0.6 ORACLE_HOME: The ORACLE_HOME directory installed on each node of the
application tier. This ORACLE_HOME hosts the various servers of the Applications
technology stack. The application tier file system is linked to this 8.0.6 ORACLE_ HOME.
Tool ORACLE_HOME: The ORACLE_HOME directory installed on each node of the
application tier. It is used for the Oracle iAS components including the Oracle HTTP server.
DATA_TOP (sys): The directory on the database node that contains the data dictionary for the entire RDBMS.
DATA_TOP (logs): The directory on the database node that contains the redo log files used by the RDBMS.
DATA_TOP (data): The directory on the database node that contains the data tablespaces. Each product has its own data tablespace within this directory.
DATA_TOP (index): The directory on the database node that contains the index tablespaces. Each product has its own index tablespace within this directory.
JAVA_TOP: Contains the Java files used by all Oracle Applications products. This directory is in the COMMON_TOP directory.
PORTAL_TOP: Contains the HTML used to review and complete the installation after Rapid Install. These include the post-install steps and the configuration files, written as HTML files.
JRE_TOP: Contains the Java Runtime Engine files used by all Oracle Applications products. These include the Java platform core classes and supporting files.
Temp Directory: Contains temporary files. This directory is not used during installation.
Apps OS User (UNIX): Owner of the Oracle Applications file system and the Applications technology stack.
Apps OS Group (UNIX): Default OS (operating system) group for the Applications OS user.
Oracle OS User (UNIX): Owner of the database file system.
Oracle OS Group (UNIX): Default OS (operating system) group for the Oracle OS user.
NT User (Windows): If you choose the Windows platform for running the concurrent
manager service, this is the user that runs the service.
NT Password (Windows): If you choose the Windows platform for running the concurrent
manager service, this is the password of the user that runs the service.
DNS Domain Name: The domain the machine is assigned to on the network.
MKS Directory (Windows): MKS tools must be added in the PATH so that executables can
be used to relink Applications executables and .DLLs.
MSDEV Directory (Windows): Location of the Visual C/C++ executables and .DLL files.
Used for linking Applications executables or .DLLs.
DBA Group Name (UNIX): The user that owns the Oracle database must belong to this
group.
X DISPLAY (UNIX): Used by the reports server, forms server, apache server, and the
concurrent manager, this display must always be accessible during runtime. Should be set to an
active X Windows display, and should point to a machine that is always available to the Applications instance.
External JDK: Points to location of the JDK installation. Required by Apache to successfully start the JSERV engine. Must be the same as the location where you downloaded JDK.
OUI Inventory Path (Windows): Path used by the Oracle Universal Installer (OUI) for
installation. The Inventory contains components installed by Rapid Install and is used for patching in certain circumstances.
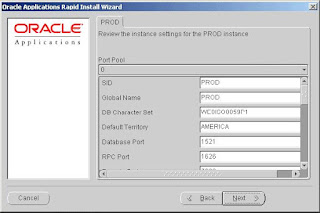
Step 9: Review instance settings information
Rapid Install uses the values specified on this screen to configure server processes, such as those on the forms and web servers, as well as listener processes.
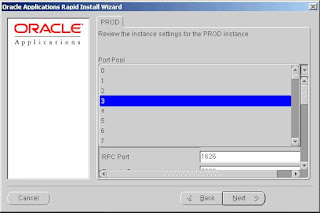
Step 9: Review instance settings information: Port Pool
The starting number of the port value is pre-set, but you can set the incremental number by using the dropdown list in the Port Pool field. The Port Pool list provides a way to use a predefined set of server ports. There are 100 port pool selections.
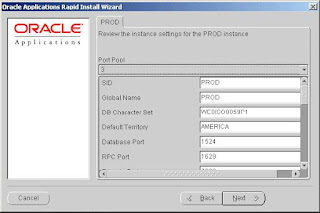
Step 9: Review instance settings information
For example, if you select 3, the default Database Port number (1521) becomes 1524
(increment of 3). If you do not want to use the port pool feature, you can specify ports manually by adjusting individual server port values where appropriate.
Use the vertical scroll bar or the Up and Down Arrow keys to move through the instance settings. You can change the values or accept the current settings. Click Next to continue.
Instance Settings
Instance Settings
SID: Name of the database instance.
Global Name: Global database name.
DB Character Set: Character set of the database.
Default Territory: Defines the NLS territory.
Database Port: Net Services Listener port that receives requests from the various servers for processing on the RDBMS.
RPC Port: Oracle Applications uses the Report Review Agent (an RPC server process). The RPC port is the TCP/IP port on the concurrent processing server node that receives incoming Report Review Agent requests.
Reports Port: TCP/IP port on the reports server that receives incoming requests from
browsers or other servers.
Web Listener Port: HTTP port on the web server that receives incoming requests from
browsers or other servers.
OProcMgr Port: Port for process that monitors the Apache JVM state. Routes requests for the JVM.
Web PLSQL Port: Port that receives PL/SQL data and HTML content from the database and
re-directs it to the PL/SQL Apache listener.
Servlet Port: Port on the web server that browsers connect to when invoking Java servlets.
Forms Listener Port: TCP/IP port on the forms server that receives incoming requests from
browsers or other servers.
Metrics Server Data Port: TCP/IP port on which the Metrics server receives load data from Metrics clients running on other machines.
Metrics Server Req. Port: TCP/IP port on which the Metrics server receives the “least-loaded host” requests from forms clients.
JTF Fulfillment Server Port: TCP/IP port on which the Fulfillment server receives requests from a remote process.
Map Viewer Servlet Port: Dedicated TCP/IP servlet port on the web server that receives requests for the Map Viewer.
OEM Web Utility Port: Dedicated TCP/IP port on the web server that receives requests for the Oracle Enterprise Manager.
VisiBroker OrbServer Agent Port: Dedicated TCP/IP port on the web server that receives requests for the VisiBroker OrbServer agent, used by Oracle Discoverer.
MSCA Server Port: Port used by the MSCA (Mobile Supply Chain Applications) server.
MSCA Dispatcher Port: Port used by the MSCA Dispatcher.
OACORE Servlet Port Range: Range of ports used by the OACORE servlets (for the Self-
Service framework).
Discoverer Servlet Port Range: Range of ports used by the Discoverer servlets.
Forms Servlet Port Range: Range of ports used for the Forms Servlet JServ processes.
XMLSVCS Servlet Port Range: Range of ports used by the XML service.
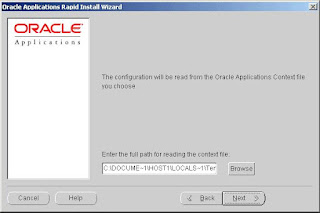
Step 10: Save the configuration file
You have now completed all the information Rapid Install needs to install your Oracle
Applications products. The next screen asks you to save your installation settings in a configuration file. This file (config.txt) stores the configuration parameters that you entered on the settings screens.
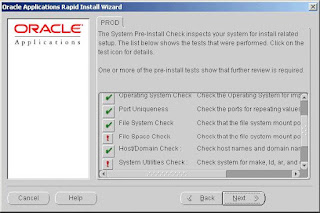
Step 11: Review pre-install test results
Rapid Install begins to perform a series of system checks to validate the configuration described by your configuration file. As the parameters are tested, the results of the validation
checks are recorded in the system test dialog box. When the tests are complete, Rapid Install
provides a check list of the tests that it performed and an indication of whether the tests succeeded or failed.
Parameter Validation
The parameters that Rapid Install validates include:
• Port Availability validates the ports you selected are available for use.
• Operating System Check validates the patches and/or version levels of your operating
system.
• Port Uniqueness validates that there are no duplicate defined ports for server processes.
• File System Check validates that file system mount points exist and have correct
privileges.
• File Space Check validates that file system mount points have sufficient space.
• Host/Domain Check validates that host and domain names are verified by the DNS
server.
• System Utilities Check validates that linking utilities (make, ld, and cc) are available.
• JDK Availability Check validates that JDK exists in the location you specified.
The results of each test are displayed using check list icons. Scroll down the list to see the results. There are three result types:
• Check mark: The test succeeded.
• Exclamation mark (!): The configuration requires review. Click the ! to get information about the system test review. Click Yes to continue, and No if you are going to resolve the issues. Rapid Install alerts you if you continue without resolving the issues.
• An x mark: All issues marked x must be resolved before you continue with the
installation. Click the x to see the errors. If you can resolve an issue by fixing the values provided on the settings screen(s), click Back until you reach the appropriate screen, and re-enter the values. Some tests must be resolved in the operating system. In that case, you may have to restart the Rapid Install wizard after the problem has been fixed.
When there are no issues to resolve, click Next to continue.
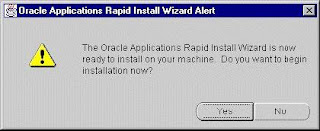
Step 12: Begin the installation
Rapid Install lists the actions it will take during the installation process. The list varies based on your installation. Click Next to continue.
Rapid Install displays another alert screen asking you to verify that you are ready to begin the installation. Click Yes to continue. Rapid Install begins the installation.Labels: Single-node Installation |
posted by Srinivasan .R @ 4:54 AM  |
|
|
|
|
|


