|
| Saturday, April 4, 2009 |
| Oracle Application Installation Guide10g Release3 |
Oracle Application Installation Guide10g Release3 (10.1.3.1) for RHEL4 (64-bit)
Overview
This guide provides step-by-step instructions for installing Oracle 10g Application R3 (10.1.3.1) 32 bit on 64 bit Linux
Scope
This document is intended to serve as an installation guide for the Oracle 10g Application on Linux platform.
Product Overview
Oracle Application Server 10g Release 3 (10.1.3.1.0) provides the Oracle SOA Suite, which is a complete set of service infrastructure components for creating, deploying, and managing Service Oriented Architectures. Oracle SOA Suite enables services to be created, managed, and orchestrated into composite applications and business processes.
■ Oracle BPEL Process Manager
■ Oracle Enterprise Service Bus (ESB)
■ Oracle Web Services Manager (OWSM)
■ Oracle Business Rules
■ Oracle Application Server (includes Oracle HTTP Server, Oracle Containers for J2EE (OC4J or J2EE Server), Oracle Enterprise Manager 10g Application Server Control, Oracle Process Manager and Notification Server and OC4J Java Single Sign-On)
You can integrate Oracle Application Server 10g Release 3 (10.1.3.1.0) with an existing Oracle Application Server environment that includes 10g Release 2 (10.1.2) or 10g (10.1.4.0.1) OracleAS Infrastructure.
System Requirements
Operating system – Red Hat Enterprise Linux AS/ES 3.0 Systems
Red Hat Enterprise Linux AS/ES 4.0 Systems
SUSE Linux Enterprise Server 9 Systems
Network - You can install Oracle Application Server on a computer that is connected to a network, or on a "standalone" computer (not connected to the network).If you are installing Oracle Application Server on a standalone computer, you can connect the computer to a network after installation. You have to perform some configuration tasks when you connect it to the network.
IP - You can install Oracle Application Server on a computer that uses static IP or DHCP-based IP.
Hostname - Ensure that your hostnames are not longer than 25characters.
Processor Speed - 300 MHz or higher Intel Pentium processor recommended
Memory - 512 MB (1GB for Production)
Disk space
Basic Installation: J2EE Server and Oracle SOA Suite: 1 GB
Advanced Installation: J2EE Server, Web Server, and Oracle SOA Suite: 1.05 GB
Advanced Installation: J2EE Server and Web Server: 650 MB
Advanced Installation: J2EE Server: 625 MB
Advanced Installation: Web Server: 500 MB
Space in TEMP directory - 400 MB
Swap space - Swap space 512 MB of available swap space
Monitor - 256 color display
Supported browsers
■ Microsoft Internet Explorer 6.0 SP2 (supported on Microsoft Windows only)
■ Netscape 7.2
■ Mozilla 1.7.
■ Firefox 1.0.4
■ Safari 1.2, 2.0 (on Apple Macintosh computers)
Software requirements
Item Requirement
Operating System Red Hat Enterprise Linux AS/ES 4.0
Red Hat Update Update 1
Software
packages
(check that these versions or
higher versions are installed) glibc-2.3.4-2.9
glibc-common-2.3.4-2.9
binutils-2.15.92.0.2-13
compat-libstdc++-296-2.96-132.7.2
gcc-3.4.3-22.1
gcc-c++-3.4.3-22.1
libstdc++-3.4.3-22.1
libstdc++-devel-3.4.3-22.1
openmotif21-2.1.30-11.RHEL4.4
pdksh-5.2.14-30
setarch-1.6-1
make-3.80-5
gnome-libs-1.4.1.2.90-44.1
sysstat-5.0.5-1
compat-db-4.1.25-9
compat-libstdc++-devel-7.3-2.96.128
compat-glibc-7.x-2.2.4.32.6
compat-libstdc++-7.3-2.96.128
control-center-2.8.0-12
xscreensaver-4.18-5.rhel4.2
64-bit Certification Red Hat Enterprise Linux AS/ES 4.0, Update 1 or higher, is certified onAMD64 and Intel EM64T. The following packages (or higher versions) are required:
binutils-2.15.92.0.2-3.x86_64.rpm
compat-db-4.1.25-9.i386.rpm (32-bit)
compat-db-4.1.25-9.x86_64.rpm
control-center-2.8.0-12.x86_64.rpm
gcc-3.4.3-22.1.x86_64.rpm
gcc-c++-3.4.3-22.1.x86_64.rpm
glibc-2.3.4-2.9.i686.rpm (32-bit)
glibc-2.3.4-2.9.x86_64.rpm
glibc-common-2.3.4-2.9.x86_64.rpm
gnome-libs-1.4.1.2.90-44.1.x86_64.rpm
libstdc++-3.4.3-22.1.i386.rpm (32-bit)
libstdc++-3.4.3-22.1.x86_64.rpm
libstdc++-devel-3.4.3-22.1.i386.rpm (32-bit)
libstdc++-devel-3.4.3-22.1.x86_64.rpm
make-3.80-5.x86_64.rpm
pdksh-5.2.14-30.x86_64.rpm
sysstat-5.0.5-1.x86_64.rpm
xscreensaver-4.18-5.rhel4.2.x86_64.rpm
setarch-1.6-1.x86_64
openmotif21-2.1.30-11.RHEL4.4.i386.rpm (32-bit)
Note the following:
■ To install 32-bit packages on a 64-bit system, you may need to use the --force option and the --nodeps option of the rpm utility.
■ Always use 32-bit shell emulation, use the following command before running the installer and any other Oracle Application Server commands or scripts:
# linux32 bash
To ensure that the system meets all the requirements, follow these steps:
1. Log in as the root user.
2. To determine which distribution and version of Linux is installed, enter the following command:
# cat /etc/issue
Red Hat Enterprise Linux AS release 4 (Nahant Update 1)
To check that Update 1 is installed:
# cat /etc/redhat-release
Red Hat Enterprise Linux AS release 4 (Nahant Update 1)
To determine whether any other package is installed, enter a command similar to the following:
# rpm -q package_name
If a package is missing, download it and install it using the following command:
# rpm -i package_name
When installing a package, make sure you are using the correct architecture and optimization rpm file. To check the architecture of an rpm file, run the following command:
# rpm -q package_name --queryformat "%{arch}\n"
In the following example, the glibc rpm file is suitable for an Intel architecture
# rpm -q glibc --queryformat "%{arch}\n" i686
5. If the hugemem kernel is used, set the architecture using following command:
prompt> setarch i386
Note
Before doing Installation Listener and Database should be in Up and Running
Creating a Group
[root@inatechsvr ~]# groupadd inatech
[root@inatechsvr ~]# cat /etc/group
Adding User to the Group
[root@inatechsvr ~]# useradd -g inatech -md /home/appsretail appsretail
[root@inatechsvr ~]# passwd appsretail
Changing password for user appsretail.
New UNIX password:
BAD PASSWORD: it is based on a dictionary word
Retype new UNIX password:
passwd: all authentication tokens updated successfully.
To verify the created group and user
[root@inatechsvr ~]# cat /etc/passwd
Requirements for the Database
Database Series Supported Versions
Oracle9i Release 2 (9.2.x) 9.2.0.7 or later
Oracle Database 10g Release 1 (10.1.x) 10.1.0.5 or later
Oracle Database Express Edition 10g Release 2 (10.2.x) 10.2.0.1
Oracle Database 10g Release 2 (10.2.x) 10.2.0.2 or later
Installing Database Schemas
If you are performing a basic installation or an advanced installation of the J2EE
Server, Web Server and SOA Suite install type, you must install the ORABPEL, ORAESB,
and ORAWSM schemas into your Oracle database before you begin the installation. To do so:
1. On Oracle Application Server Disk 1, go to the install/soa_schemas/irca
directory.
2. Run the irca.sh script.
Environment Variables
The operating system user who will be installing Oracle Application Server needs to
Set (or unset) the following environment variables.
Environment variable Set or Unset
PATH - Must not be longer than 1023 characters.
TNS_ADMIN - Must not be set.
TEMP - Optional. If unset, defaults to C:\temp.
Things You Should Know Before Starting the Installation
■ "Oracle Home Directory"
■"Installing Additional Languages"
■"Oracle Application Server Instances and Instance Names"
■"The oc4jadmin User and Restrictions on its Password"
■"Where Does the Installer Write Files?"
■"Installing on a System on which Oracle Database Lite is Running"
■"Using an Assistive Technology with the Installer"
■"Rules for Adding Instances to OracleAS Clusters"
■"Obtaining Software from Oracle E-Delivery"
■"Starting the Oracle Universal Installer"
Installing J2EE Server, Web Server and SOA Suite
Steps for Installing J2EE Server, Web Server and SOA Suite
Screen Action
1. -- Start Oracle Universal Installer.
2. Oracle ApplicationServer SOA Suite10.1.3.1.0 Installation
Specify the Oracle Home in the Installation Directory field.
Select Advanced Install.
Click Next.
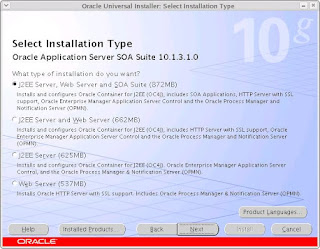
3. Select Installation Type Select J2EE Server, Web Server and SOA Suite.
Click Next.
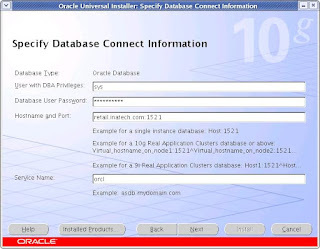
4. Specify Database Connect Information
Specify your Oracle database connection information.
Specify the DBA user in the User with DBA Privileges field.
Specify the password for the DBA user in the Database User Password field.
Specify the hostname and port for the database in the Hostname and Port field.
Specify the service name of the database in the Service Name field.
Click Next.
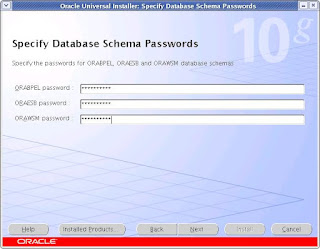
5. Specify Database Schema Passwords
Specify the passwords for the ORABPEL, ORAESB, and ORAWSM database schemas.
Click Next.
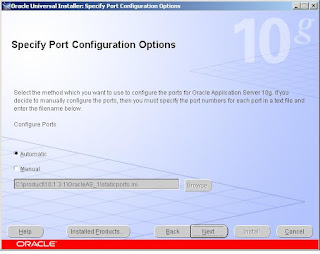
6. Specify Port Configuration Options
Select whether you want to configure ports automatically or manually by specifying the location of a port configuration file.
Click Next.
Advanced Installation Steps
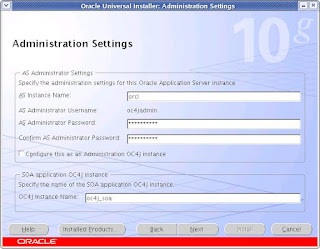
7. Administration Settings Specify the Oracle Application Server instance name and oc4jadmin password.
Select Configure this as an Administration OC4J instance if you would like to run Application Server Control on this instance.
Specify the Oracle Containers for J2EE instance name. The default instance name is
oc4j_soa.
Click Next.
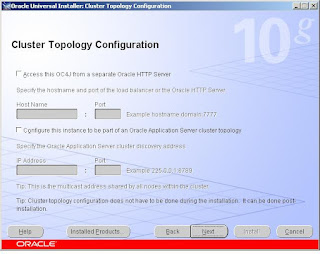
8. Cluster Topology Configuration
Select Access this OC4J Instance from a separate Oracle HTTP Server if you want the default web site to run in AJP protocol mode and specify the hostname and
port of the Oracle HTTP Server. Select Configure this instance to be a part of an Oracle Application Server cluster topology if you would like to configure this instance to be part of an Oracle Application Server cluster topology. Specify the IP address and port for the multicast address.
Click Next.
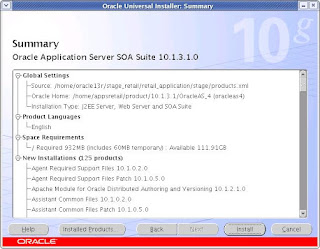
9. Summary Verify that the installation parameters shown on the screen are correct.
Click Install.
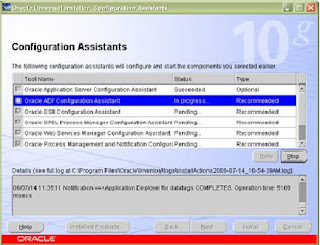
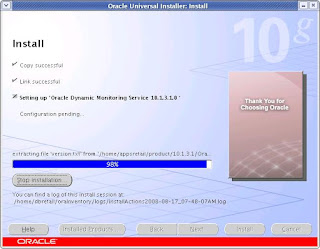
10. Install None. This screen shows the progress of the installation.
11. Configuration Assistants None, unless you want to stop the installation of a particular configuration assistant.
12. End of Installation None. This screen tells you whether or not your installation was successful, and provides a link to the product release notes.
Installation Steps
To begin the installation of the Oracle 10g application, perform the following steps:
Login as a application User,
Go to the location of software,
$cd /home/oracle13r/stage_retail/retail_application/
Terminal 1
$export Display =10.1.15.96:0.0
Terminal 2
$xhost +10.1.15.96
Now, Start the Installation.
$ ./runInstaller
Now, Start the Installation.
Screen Shots
1. Administration Settings
2. Select Installation Type Screen
3. Specify Database Connection Information
4. Specify Database Schema Passwords
5. Specify Port Configuration Options
6. Cluster Topology configuration Screen
7. Summary
8. Configuration Assistants
9. Install Screen
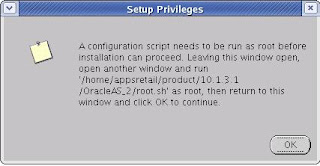
10. Setup Privileges
11. Install Screen

These instructions are located in /home/appsretail/product/10.1.3.1/OracleAS_1/install/readme.txt for your future reference.
You can view the status of the server with the following command:
/home/appsretail/product/10.1.3.1/OracleAS_1/opmn/bin/opmnctl status
Access the Welcome Page with the following URL:
http://retail.hostname.com:7777/
Access the Oracle Container for J2EE with the following URL:
http://retail.hostname.com:7777/j2ee
Accessing the Welcome Page
After installation, access the Oracle Application Server Welcome page to verify that the installation was successful. The URL for the Welcome page is:
http://hostname.domainname:http_port
E.g. http://retail.hostname.com:7777
You can locate the URL for accessing the Welcome Page on the End of Installation Screen text, which is stored in the following file:
ORACLE_HOME\install\readme.txt
The Welcome page provides links to these useful pages:
■ New features in Oracle Application Server 10g Release 3 (10.1.3)
■ Oracle Enterprise Manager Application Server Control ("Application Server Control"), which is a browser-based administrative tool
■ Release Notes
■ Quick Start
■ DemosLabels: Oracle Application Installation Guide10g Release3 |
posted by Srinivasan .R @ 12:02 PM  |
|
| 2 Comments: |
-
Hai srinivasan...Can i install and configure portal 10.1.2 with E-business suite 12i database.I don't want to maintain seperate Metabase repository for Portal instead of i use EBS R12 database?
-
|
| |
| << Home |
| |
|
|
|
|


Hai srinivasan...Can i install and configure portal 10.1.2 with E-business suite 12i database.I don't want to maintain seperate Metabase repository for Portal instead of i use EBS R12 database?